Building a Movie Collection Manager - Full Stack Workshop with Rust, Actix, SQLx, Dioxus, and Shuttle

Welcome to the this workshop! In this hands-on workshop, we will guide you through the process of building a full stack application using Rust for the API, Actix-Web as the web framework, SQLx for database connectivity, Dioxus for the front-end, and Shuttle for deployment. This workshop assumes that you have a basic understanding of Rust and its syntax.
Throughout the workshop, you will learn how to set up a Rust project with Actix-Web, implement CRUD operations for movies, establish database connectivity with PostgreSQL using SQLx, design a responsive front-end with Dioxus, and deploy the application to a hosting environment using Shuttle.
By the end of the workshop, you will have built a functional movie collection manager application. You will understand how to create APIs with Actix-Web, work with databases using SQLx, design and develop the front-end with Dioxus, and deploy the application using Shuttle. This workshop will provide you with practical experience and insights into building full stack applications with Rust.
Prerequisites:
- Basic knowledge of the Rust programming language
- Familiarity with HTML, CSS, and JavaScript is helpful but not required
Check the Prerequisites section of the workshop guide for more details.
Workshop Duration: 4,5 hours
Workshop schedule
1. Knowing the audience and installing everything
  - Introduction to the workshop
  - Installing Rust, Cargo, and other dependencies

2. Building the API with Actix-Web, SQLx and Shuttle
  - Introduction to Shuttle, Actix-Web and its features
  - Setting up and deploying an Actix-Web project
  - Establishing database connectivity with SQLx
  - Creating API endpoints for movie listing
  - Implementing CRUD operations for movies

3. Designing the Front-End with Dioxus
  - Introduction to Dioxus
  - Setup and installation
  - Components
  - State management
  - Event handling
  - Building
The revised workshop schedule incorporates deployment with Shuttle, allowing participants to learn how to prepare and deploy the application to a hosting environment.
Repository Structure:
├── api            # Rust API code
│   ├── lib        # Actix-Web API code
│   └── shuttle    # Shuttle project
├── front          # Dioxus front-end code
├── shared         # Common code shared between the API and the front-end
└── README.md      # Workshop instructions and guidance
Resources:
- Rust: https://www.rust-lang.org/
- Actix-Web: https://actix.rs/
- SQLx: https://github.com/launchbadge/sqlx
- Dioxus: https://dioxuslabs.com/
- Shuttle: https://www.shuttle.rs/
We hope you enjoy the workshop and gain valuable insights into building full stack applications with Rust, Actix, SQLx, Dioxus, and Shuttle. If you have any questions or need assistance, please don't hesitate to ask during the workshop. Happy coding!
Prerequisites
In order to start the workshop there are a few things that we will have to install or set up.
Rust
If you don't have Rust installed in your machine yet, please follow these instructions.
Visual Studio Code
You can use whatever IDE you want but we're going to use Visual Studio Code as our code editor.
If you're going to use Visual Studio Code as well, please install the following extensions:
Shuttle
This is the tool and platform that we're going to use to deploy our backend (api & database).
You can follow this installation guide or just do:
cargo install cargo-shuttle
Dioxus
Dioxus is the framework that we're going to use to build our frontend.
Be sure to install the Dioxus CLI:
cargo install dioxus-cli
After that, make sure the wasm32-unknown-unknown target for Rust is installed:
rustup target add wasm32-unknown-unknown
Docker
We will also need to have Docker installed in order to deploy locally while we're developing the backend.
DBeaver
We will use DBeaver to connect to the database and run queries. Feel free to use any other tool that you prefer.
cargo-watch
We will also use cargo-watch to automatically recompile our backend when we make changes to the code.
cargo install cargo-watch
cargo-make
Finally, let's install cargo-make:
cargo install cargo-make
We're going to leverage cargo-make to run all the commands that we need to run in order to build and deploy our backend and frontend.
Backend
The goal of this part of the workshop is to create a simple API that will be used by the front-end.
Tools and Frameworks
Take the time to read the documentation of each of these tools and frameworks to learn more.
Guide
If you get lost during the workshop, you can always refer to:
- the workshop conductors
- the workshop GitHub repository which contains the final code with tests, mocks, memory database, CI/CD, etc.
- the dry-run workshop GitHub repository: each commit corresponds to a step of the workshop. You will see that some sections will instruct you to commit your code. You can always refer to this repository to see what the code should look like at that point.
Workspace Setup
Let's start by creating a new workspace for our project.
You can learn more about workspaces in the Rust Book
The basic idea is that we will create a monorepo with different crates that will be compiled together.
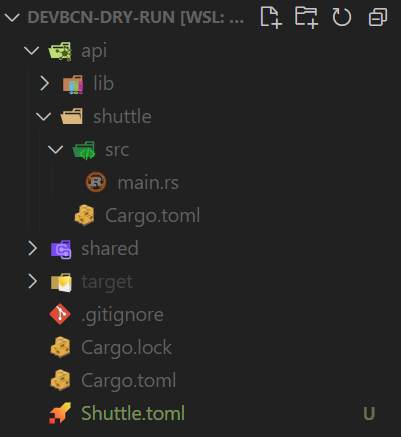
Remember that our project will have this structure:
├── api            # Rust API code
│   ├── lib        # Actix-Web API code
│   └── shuttle    # Shuttle project
├── front          # Dioxus front-end code
├── shared         # Common code shared between the API and the front-end
└── README.md      # Workshop instructions and guidance
Creating the workspace
Create a new folder for the project and initialize a new workspace by creating a Cargo.toml file with the following content:
[workspace]
members = [
    "api/lib",
    "api/shuttle",
    "shared"
]
resolver = "2"
We will add the front crate later, don't worry.
Initializing the repository
Let's initialize a new git repository for our project.
git init
Creating the crates
Now that we have a workspace, we can create the crates that will be part of it.
For the API, we will create two crates:
lib: Library containing the code for the API.shuttle: Executable for the shuttle project.
Having two different crates is totally optional, but it will allow us to have a cleaner project structure and will make it easy to reuse the API library code if we decide to not use Shuttle in the future.
Shuttle will allow us to run our API locally and deploy it to the cloud with minimal effort but it is not required to build the API.
We could decide to use a different executable to run our API that would use the lib crate as a dependency. For instance, we could use Actix Web directly to create such a binary and release it as a Docker image.
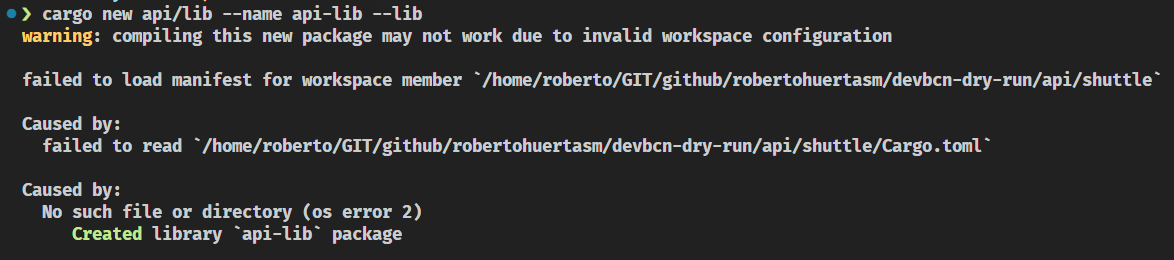
Creating the lib crate
Let's create the lib crate by running the following command:
cargo new api/lib --name api-lib --lib --vcs none
Note that we are using the --lib flag to create a library crate. If you forget to add this flag, you will have to manually change the Cargo.toml file to make it a library crate.
The vsc flag is used in this case to tell cargo to not initialize a new git repository. Remember that we already did that in the previous step.
Creating the shuttle crate
Let's create the shuttle crate by running the following command:
cargo shuttle init api/shuttle -t actix-web --name api-shuttle
Creating the shared crate
Finally, let's create the shared crate by running the following command:
cargo new shared --lib
Note we're not using the --name flag this time. This is because the name of the crate will be inferred from the name of the folder.
Buidling the project
Let's build the project to make sure everything is working as expected.
cargo build
You should see something like this:
As you can see, a new target folder has been created. This folder contains the compiled code for all the crates in the workspace and that's why we're seeing so many objects to be committed.
The target folder should be ignored by git.
Let's create a .gitignore file in the root of our repo and add the following content:
target/
Secrets*.toml
Aside from that, remove all the .gitignore files from the crates as they are not needed anymore.
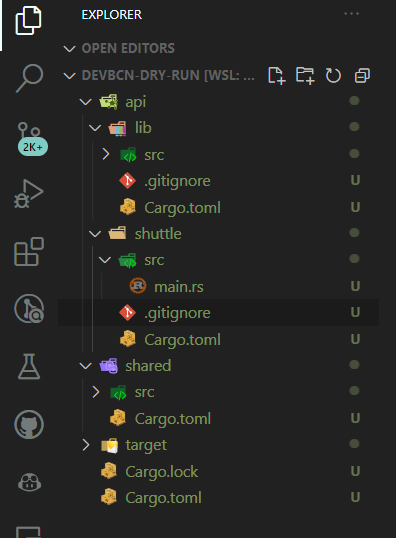
This is how it should look like:

Committing the changes
If you have arrived here, you can commit your changes.
git add .
git commit -m "Initial commit"
Exploring Shuttle
Open the api/shuttle folder and look for the src/main.rs file. This is the entry point of our application.
You'll see something like this:
#![allow(unused)]
fn main() {
use actix_web::{get, web::ServiceConfig};
use shuttle_actix_web::ShuttleActixWeb;

#[get("/")]
async fn hello_world() -> &'static str {
    "Hello World!"
}

#[shuttle_runtime::main]
async fn actix_web(
) -> ShuttleActixWeb<impl FnOnce(&mut ServiceConfig) + Send + Clone + 'static> {
    let config = move |cfg: &mut ServiceConfig| {
        cfg.service(hello_world);
    };

    Ok(config.into())
}
}
Shuttle has generated a simple hello-world Actix Web application for us.
As you can see, it's pretty straight-forward.
The actix_web function is the entry point of our application. It returns a ShuttleActixWeb instance that will be used by Shuttle to run our application.
In this function, we're going to configure our different routes. In this case, we only have one route: /, which is mapped to the hello_world function.
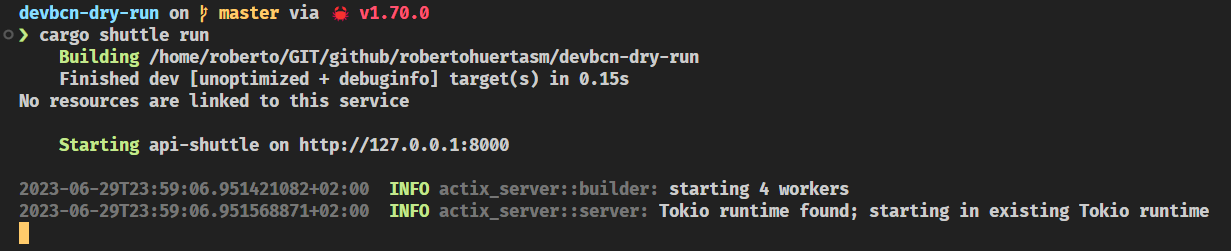
Let's run it!
In the root of the project, run the following command:
cargo shuttle run
You should see something like this:
Now curl the / route:
curl localhost:8000
Or open it in your browser.
Hopefully, you should see a greeting in your screen!
And that's how easy it is to create a simple API with Shuttle!
Try to add more routes and see what happens!
We're using Actix Web as our web framework, but you can use any other framework supported by Shuttle.
Check out the Shuttle documentation to learn more. Browse through the Examples section to see how to use Shuttle with other frameworks.
At the moment of writing this, Shuttle supports:
Deploying with Shuttle
So far so good. We have a working API and we can run it locally. Now, let's deploy it to the cloud and see how easy it is to do so with Shuttle.
Shuttle.toml file
Shuttle will use the name of the workspace directory as the name of the project.
As we don't want to collide with other people having named the folder in a similar way, we will use a Shuttle.toml file to override the name of the project.
Go to the root of your workspace and create a Shuttle.toml file with the following content:
name = "name_you_want"
Your directory structure should look like this:
Commit the changes to your repository.
git add .
git commit -m "add Shuttle.toml file"
Deploying to the cloud
Now that we have a Shuttle.toml file, we can deploy our API to the cloud. To do so, run the following command:
cargo shuttle deploy
You should get an error message similar to this one:

Login to Shuttle
Let's do what the previous message suggests and run cargo shuttle login.
Take into account that you will need to have a GitHub account to be able to login.
The moment you run the cargo shuttle login command, you will be redirected to a Shuttle page like this so you can authorize Shuttle to access your GitHub account.

In your terminal, you should see something like this:

Continue the login process in your browser and copy the code you get in the section 03 of the Shuttle page.

Then paste the code in your terminal and press enter.

Let's deploy!
Now that we have logged in, we can deploy our API to the cloud. To do so, run the following command:
cargo shuttle deploy
Oh no! We got another error message:

The problem is that we haven't created the project environment yet. Let's do that now.
cargo shuttle project start
If everything went well, you should see something like this:

Now, let's finally deploy our API to the cloud by running the following command again:
cargo shuttle deploy
You should see in your terminal how everything is being deployed and compiled in the Shuttle cloud. This can take a while, so be patient and wait for a message like the one below:
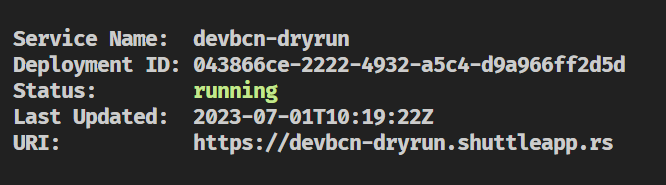
Browse to the URI shown in the message or curl it to see the result:
curl https://<your_project_name>.shuttleapp.rs
Hello world! Easy, right?
We have deployed our API to the cloud!
The URI of your project is predictable and will always conform to this convention: https://<your_project_name>.shuttleapp.rs.
Shuttle CLI and Console
CLI
Shuttle provides a CLI that we can use to interact with our project. We already have used it to create the project and to deploy it to the cloud.
Let's take a look at the available commands:
cargo shuttle --help
You can also get more information by exploring the Shuttle CLI documentation.
Interesting commands
Let's take a look at some of the commands that we will use the most.
cargo shuttle deploy: Deploy the project to the cloud.cargo shuttle logs: Display the logs of a deployment.cargo shuttle status: Display the status of the service.cargo shuttle project status: Display the status of the project.cargo shuttle project list: Display a list of projects and their current status.cargo shuttle project restart: Restart a project. Useful when you need to upgrade the version of your Shuttle dependencies.cargo shuttle resource list: Display a list of resources and their current status. Useful to see connection strings and other information about the resources used by the project.
Console
Shuttle also provides a Console that we can use to interact with our project.
It's still in the early days but it already provides some interesting features. For instance, we can use it to see the logs of our project.
Working with a Database
For our project we will use a PostgreSQL database.
You may be already thinking about how to provision that database both locally and in the cloud, and the amount of work that it will take to do so. But no worries, we will use Shuttle to do that for us.
Using Shuttle Shared Databases
Open this link to the Shuttle Docs and follow the instructions to create a shared database in AWS.
As you will be able to see, just by using a macro we will be able to get a database connection injected into our code and a database fully provisioned both locally and in the cloud.
So let's get started!
Adding the dependencies
Go to the Cargo.toml file in the api > shuttle folder and add the following dependencies to the ones you already have:
[dependencies]
...
# database
shuttle-shared-db = { version = "0.47.0", features = ["postgres", "sqlx"] }
sqlx = { version = "0.7", default-features = false, features = [
    "tls-native-tls",
    "macros",
    "postgres",
    "uuid",
    "chrono",
    "json",
] }
If you want to learn more about how to add dependencies to your Cargo.toml file, please refer to the Cargo Docs.
We are adding the shuttle-shared-db dependency to get the database connection injected into our code and the SQLx dependency to be able to use the database connection.
Note that the SQLx dependency has a lot of features enabled. We will use them later on in the project.
If you want to learn more about features in Rust, please refer to the Cargo Docs.
Injecting the database connection
Now that we have the dependencies, we need to inject the database connection into our code.
Open the main.rs file in the api > shuttle > src folder and add the following code as the first parameter of the actix_web function:
#![allow(unused)]
fn main() {
 #[shuttle_shared_db::Postgres] pool: sqlx::PgPool,
}
The function should look like this:
#![allow(unused)]
fn main() {
#[shuttle_runtime::main]
async fn actix_web(
    #[shuttle_shared_db::Postgres] pool: sqlx::PgPool,
) -> ShuttleActixWeb<impl FnOnce(&mut ServiceConfig) + Send + Clone + 'static> {
    let config = move |cfg: &mut ServiceConfig| {
        cfg.service(hello_world);
    };

    Ok(config.into())
}
}
Let's build the project. We will get a warning because we're not using the pool variable yet, but we will fix that in a moment.
cargo build
Running the project
Now that we have the database connection injected into our code, we can run the project and see what happens.
cargo shuttle run
You will see that the project is building and then it will fail with the following error:
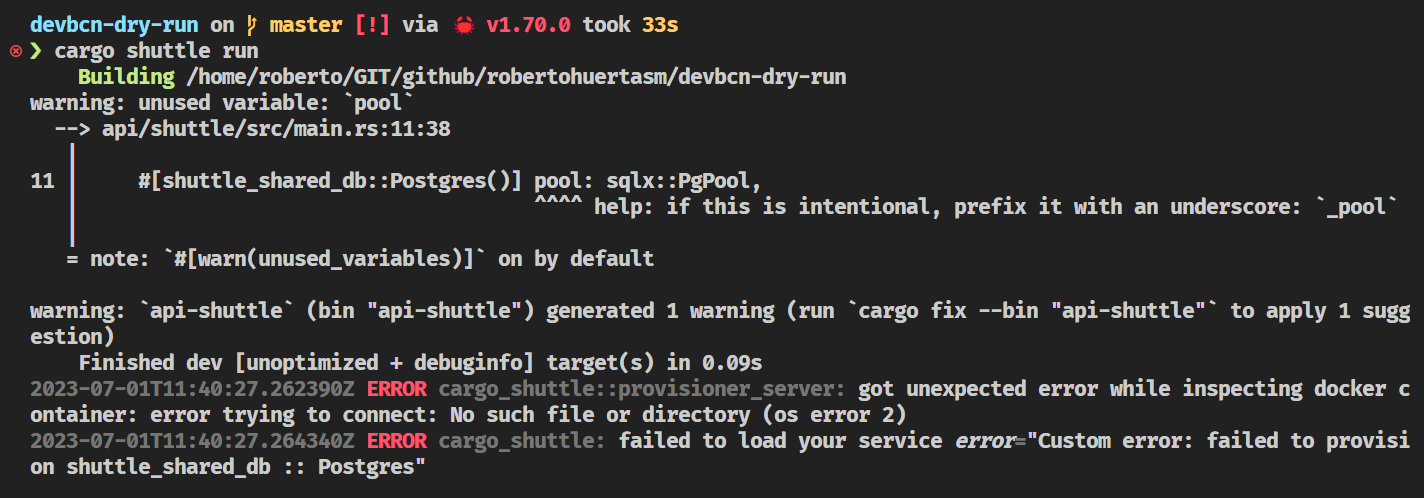
Docker
The error is telling us that we need to have Docker running in our system.
Let's start Docker and run the project again.
cargo shuttle run
This time the project will build and run successfully.
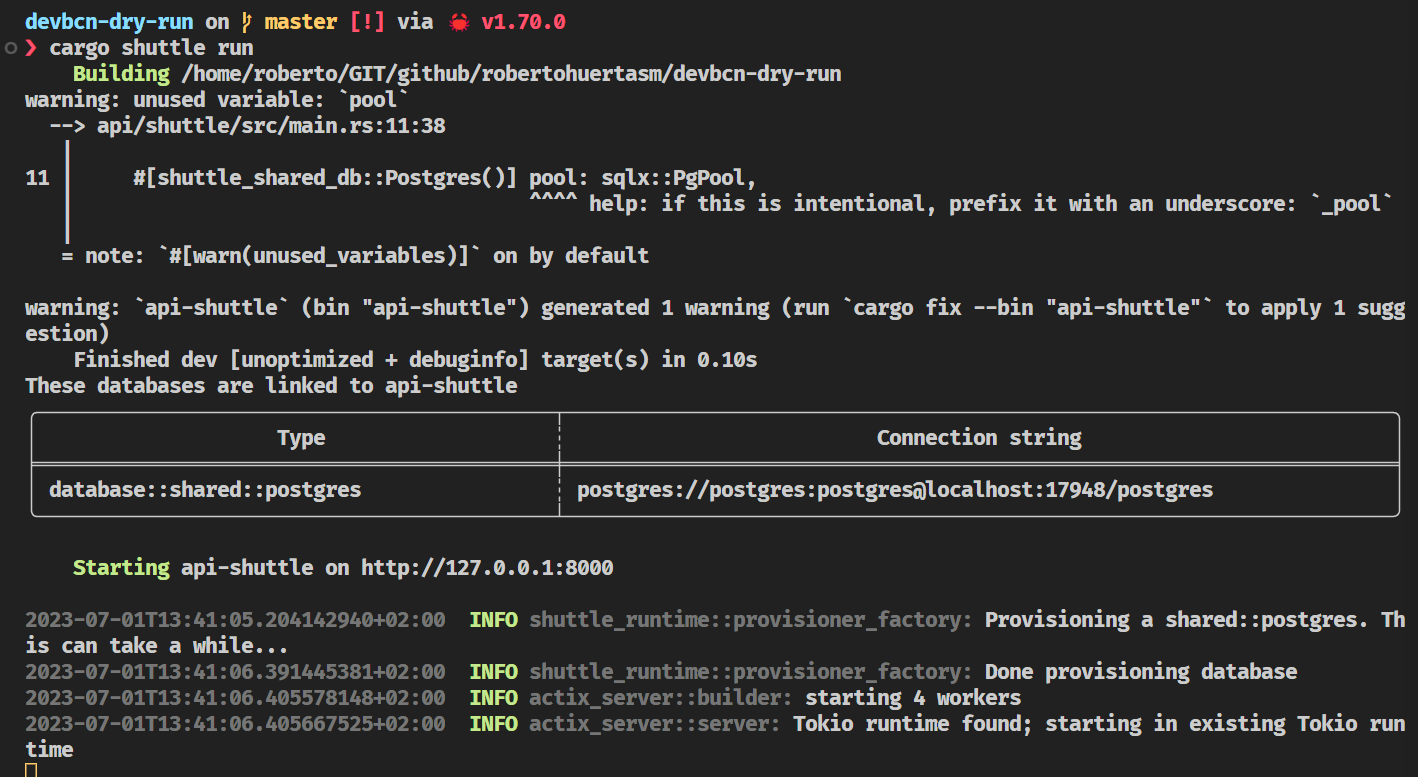
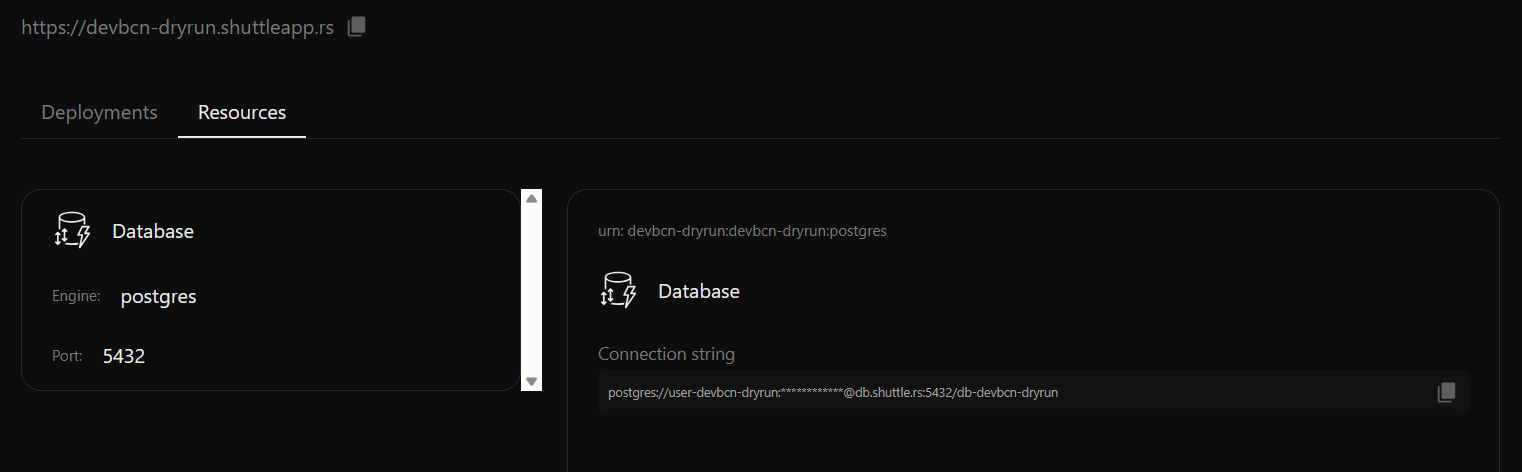
Note that you will be able to find the connection string to the database in the logs. We will use that connection string later on in the project.
Commit your changes.
git add .
git commit -m "add database connection"
Setting up the Database
In this section we will setup the database for our project.
This is going to be a very simple CRUD application, so we will only need one table for our movies.
Creating the initial script
There are many ways to work with a database. We could use the SQLx CLI or Refinery to create and manage our database migrations, but as this is out of the scope of this workshop, we will create a simple script that will create the table for us.
Create a new file api/db/schema.sql with the following content:
CREATE EXTENSION IF NOT EXISTS "uuid-ossp";

CREATE TABLE IF NOT EXISTS films
(
    id uuid DEFAULT uuid_generate_v1() NOT NULL CONSTRAINT films_pkey PRIMARY KEY,
    title text NOT NULL,
    director text NOT NULL,
    year smallint NOT NULL,
    poster text NOT NULL,
    created_at timestamp with time zone default CURRENT_TIMESTAMP,
    updated_at timestamp with time zone
);
You can see that this script will create a table called films only if that table does not exist yet.
Executing the initial script
Now that we have the script, we need to execute it.
Open the main.rs file in the api > shuttle > src folder and add the following code as the first line in the body of the actix_web function:
#![allow(unused)]
fn main() {
// initialize the database if not already initialized
pool.execute(include_str!("../../db/schema.sql"))
    .await
    .map_err(CustomError::new)?;
}
Add the following imports to the top of the file:
#![allow(unused)]
fn main() {
use shuttle_runtime::CustomError;
use sqlx::Executor;
}
Be sure that the path to the schema.sql file is correct. Try changing the path to something else and see what happens when you try to compile the project: cargo build.
Running the project
Let's run the project again and see if the database is created as expected.
cargo shuttle run
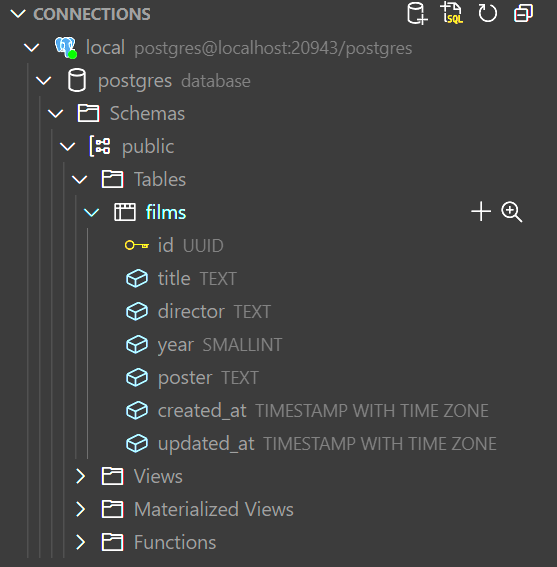
If you check your database, you should see that the films table has been created:
Commit your changes.
git add .
git commit -m "setup database"
Connecting to the Database
Now that we have everything we need, let's start by doing a simple endpoint that will get the database version.
This will help us to get acquainted with SQLx.
Creating the endpoint
Can you create the endpoint yourself?
Don't worry about how to retrieve the information from the database, we will do that in a moment. Just focus on creating and endpoint that will return a string. The string can be anything you want and the route should be /version.
If you're not sure about how to do it, expand the section below to see the solution.
Solution
Solution
Open the main.rs file in the api > shuttle > src folder and add the following code:
#![allow(unused)]
fn main() {
#[get("/version")]
async fn version() -> &'static str {
    "version 0.0.0"
}
}
Setting up the endpoint
You may have noticed that if you run the project and go to the /version route, you will get a 404 error.
curl -i http://localhost:8000/version # HTTP/1.1 404 Not Found
This is because we haven't set up the endpoint yet.
Can you guess how to do it?
Solution
Solution
Add this to the line containing this piece of code cfg.service(hello_world); in the main.rs file in the api > shuttle > src folder: .service(version).
The line should look like this
#![allow(unused)]
fn main() {
let config = move |cfg: &mut ServiceConfig| {
    // NOTE: this is the modified line
    cfg.service(hello_world).service(version);
};

}
Now, let's try it again:
curl -i http://localhost:8000/version # HTTP/1.1 200 OK version 0.0.0
Did it work? If so, congratulations! You have just created your first endpoint.
Connecting to the database
Now that we have the endpoint, let's connect to the database and retrieve the version.
For that we will need to do a couple of things:
- Pass the database connection pool to the endpoint.
- Execute a query in the endpoint and return the result.
Passing the database connection pool to the endpoint
In order to pass the connection pool to the endpoints we're going to leverage the Application State Extractor from Actix Web.
You can learn more about how to handle the state in Actix Web in the official documentation.
Ok, so just after the line where we initialized our database, let's add the following code:
#![allow(unused)]
fn main() {
let pool = actix_web::web::Data::new(pool);
}
You may have noticed that we're using the same name for the variable that holds the connection pool and the one that holds the data. This is called variable shadowing.
Now, we need to change again the line we changed before when we added a new endpoint and use the .app_data method like this:
#![allow(unused)]
fn main() {
let config = move |cfg: &mut ServiceConfig| {
    cfg.app_data(pool).service(hello_world).service(version);
};
}
Executing a query in the endpoint and returning the result
Now let's change our version endpoint so we can get the connection pool from the state and execute a query. If you have taken a look to the Application State Extractor documentation it should be pretty straightforward.
We have to add a parameter to the version function that will be our access to the database connection pool. We will call it db and it will be of type actix_web::web::Data<sqlx::PgPool>.
#![allow(unused)]
fn main() {
#[get("/version")]
async fn version(db: actix_web::web::Data<sqlx::PgPool>) -> &'static str {
    "version 0.0.0"
}
}
Now, we need to execute a query. For that, we will use the sqlx::query_scalar function.
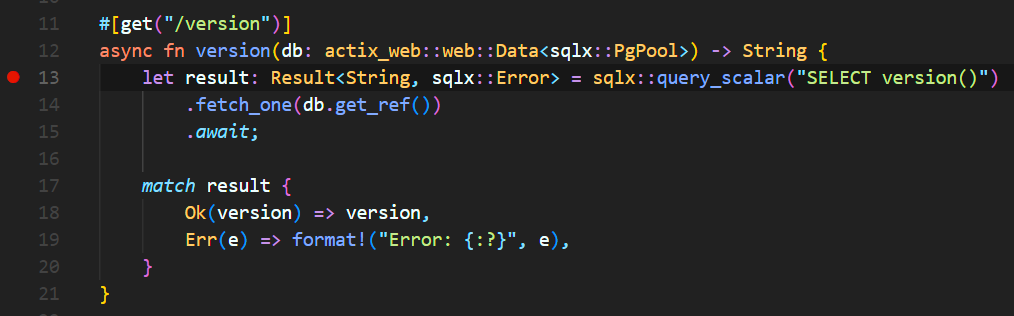
Let's change the version function to this:
#![allow(unused)]
fn main() {
#[get("/version")]
async fn version(db: actix_web::web::Data<sqlx::PgPool>) -> String {
    let result: Result<String, sqlx::Error> = sqlx::query_scalar("SELECT version()")
        .fetch_one(db.get_ref())
        .await;

    match result {
        Ok(version) => version,
        Err(e) => format!("Error: {:?}", e),
    }
}
}
There are a couple of things going on here, so let's break it down.
First of all, it's worth noticing that we changed the return type of the function to String. This is for two different reasons:
- We don't want our endpoint to fail. If the query fails, we will have to return an error message as a
String. - We need that return to be a
Stringbecause the version of the database will come to us as aString.
On the other hand, we have the sqlx::query_scalar function. This function will execute a query and return a single value. In our case, the version of the database.
As you can see, the query is pretty simple. We're just selecting the version of the database. The most interesting part in there is that we need to use the .get_ref() method to get a reference to the inner sqlx::PgPool from the actix_web::web::Data<sqlx::PgPool>.
Finally, we have the match expression. The sqlx::query_scalar function will return a Result with either the version of the database or an error. With the match expression we're covering both cases and we will make sure that we will always return a String.
Note that most of the time we don't need the return keyword in Rust. The last expression in a function will be the return value.
Introduce an error in the query and see what happens. Take some time to check out how the format macro works.
Note that even if you introduce an error in the query, the endpoint will not fail or even return a 500 error. This is because we're handling the error in the match expression.
We will see later how to handle errors in a more elegant way.
For now, let's commit our changes:
git add .
git commit -m "add version endpoint"
Deploying the Database
By now, this should be a familiar process. We'll use the same shuttle command we used to deploy the backend to deploy the database.
cargo shuttle deploy
As you've seen, we don't need to do anything special to deploy the database. Shuttle will detect that we have a database dependency in our code and will provision it for us. Neat, isn't it?
While the deployment takes place, you can take a look at this blog post to learn more about the concept of Infrastructure From Code.
Once the deployment is complete, you can check the database connection string in the terminal.

Don't worry if you missed it. You can always check the database connection string in the terminal by running the following command.
cargo shuttle resource list
You can also go to the Shuttle Console and check the database connection string there.
Testing the new endpoint
curl -i https://your-project-name.shuttleapp.rs/version
You should get a response similar to the following.
HTTP/1.1 200 OK
content-length: 115
content-type: text/plain; charset=utf-8
date: Sat, 01 Jul 2023 16:27:07 GMT
server: shuttle.rs

PostgreSQL 14.8 (Debian 14.8-1.pgdg120+1) on x86_64-pc-linux-gnu, compiled by gcc (Debian 12.2.0-14) 12.2.0, 64-bit
Debugging
In the section we are going to cover how to debug the backend using Visual Studio Code.
Make sure that you have installed these two extensions:
Once you have them installed, create a new file in the root of the project called .vscode/launch.json with the following content:
{
  // Use IntelliSense to learn about possible attributes.
  // Hover to view descriptions of existing attributes.
  // For more information, visit: https://go.microsoft.com/fwlink/?linkid=830387
  "version": "0.2.0",
  "configurations": [
    {
      "type": "lldb",
      "request": "attach",
      "name": "Attach to Shuttle",
      "program": "${workspaceFolder}/target/debug/api-shuttle"
    }
  ]
}
The most important point to take into account here is that the program attribute must point to the binary that you want to debug.
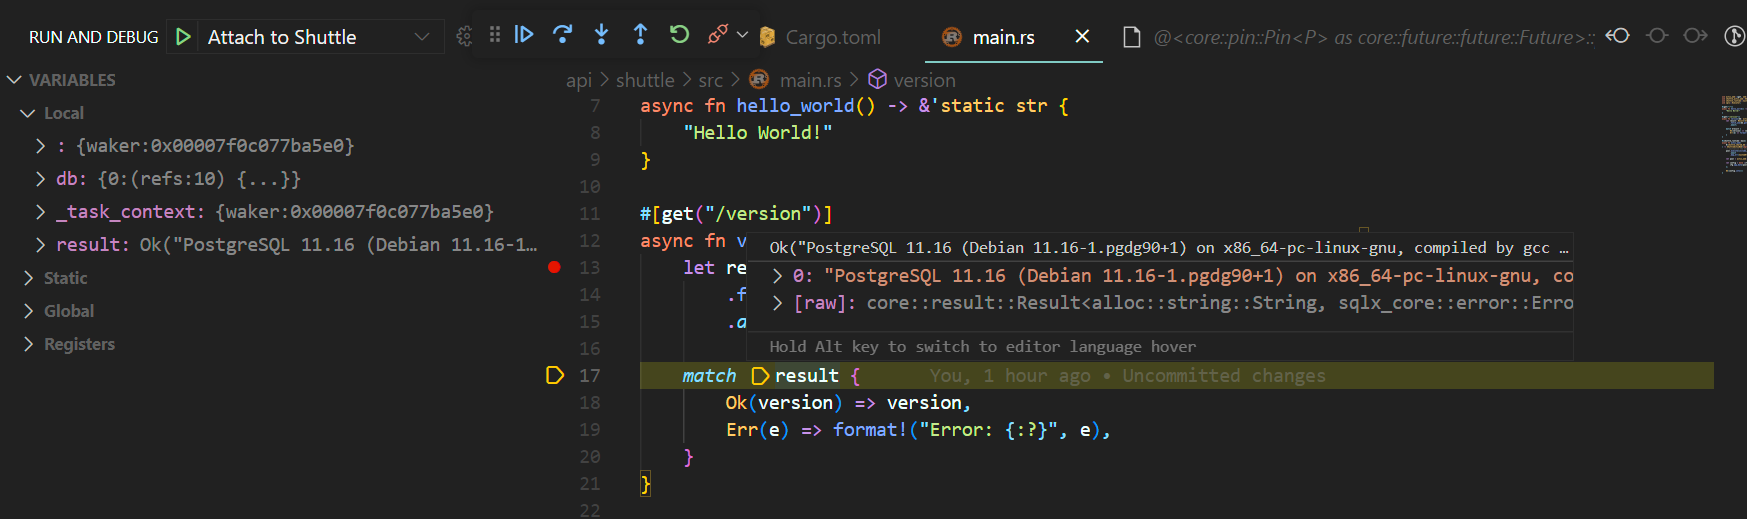
So, in order to test that this is working, let's put a breakpoint in our version endpoint:
Now, run the project with cargo shuttle run and then press F5 to start debugging.
curl the version endpoint:
curl -i https://localhost:8000/version
Commit your changes:
git add .
git commit -m "add debugging configuration"
Instrumentation
In order to instrument our backend, we are going to use the tracing crate.
Let's add this dependency to the Cargo.toml file of our Shuttle crate:
tracing = "0.1"
Now, let's add some instrumentation to our main.rs file. Feel free to add as many logs as you want. For example:
#![allow(unused)]
fn main() {
#[get("/version")]
async fn version(db: actix_web::web::Data<sqlx::PgPool>) -> String {
    // NOTE: added line below:
    tracing::info!("Getting version");
    let result: Result<String, sqlx::Error> = sqlx::query_scalar("SELECT version()")
        .fetch_one(db.get_ref())
        .await;

    match result {
        Ok(version) => version,
        Err(e) => format!("Error: {:?}", e),
    }
}
}
If you run the application now, and hit the version endpoint, you should see something like this in the logs of your terminal:
2023-07-01T19:47:32.836809924+02:00 INFO api_shuttle: Getting version
Log level
By default, the log level is set to info. This means that all logs with a level of info or higher will be displayed. If you want to change the log level, you can do so by setting the RUST_LOG environment variable. For example, if you want to see all logs, you can set the log level to trace:
RUST_LOG=trace cargo shuttle run
For more information about Telemetry and Shuttle, please refer to the Shuttle documentation.
Let's commit our changes:
git add .
git commit -m "added instrumentation"
Watch Mode
You may be thinking that it would be nice to have a way to automatically restart the backend when you make changes to the code.
Well, you're in luck! Enter cargo-watch.
If you don't have it already installed, you can do so by running:
cargo install cargo-watch
Next, in order to start the backend in watch mode, you can run:
cargo watch -x "shuttle run"
This will start the backend in watch mode. Now, whenever you make changes to the code, the backend will automatically restart.
Moving our endpoints to a library
The idea behind this section is to move our endpoints to a library so that we can reuse them in case we want to provide a different binary that doesn't rely on Shuttle.
Imagine, for example, that you want to deploy your API to your cloud of choice. Most probably you'll want to use a container to do so. In that case, having our endpoints in a library will allow us to create a binary that works purely on Actix Web.
Adding a local dependency
Remember that we already created a lib crate in one of the previous sections? Well, we are going to use that crate to move our endpoints there.
But first of all, we need to add a dependency to our api-shuttle Cargo.toml file. We can do so by adding the following line:
[dependencies]
...
api-lib = { path = "../lib" }
api-lib is the name we gave to that library (you can check that in the Cargo.toml file in the api > lib folder).
Compile and check that you don't receive any compiler error:
# just compile
cargo build
# or compile in watch mode
cargo watch -x build
# or run the binary
cargo shuttle run
# or run the binary in watch mode
cargo watch -x "shuttle run"
As you can see, adding a local dependency is trivial. You just need to specify the path to the library.
Moving the endpoints
Open the api > lib > src folder and create a new file called health.rs. This file will contain just one endpoint that will be used to check the health of the API, but for the sake of the example, we are going to temporary move our previous endpoints here.
Copy the following code in api > shuttle > src > main.rs to our recently created file health.rs:
#![allow(unused)]
fn main() {
#[get("/")]
async fn hello_world() -> &'static str {
    "Hello World!"
}

#[get("/version")]
async fn version(db: actix_web::web::Data<sqlx::PgPool>) -> String {
    tracing::info!("Getting version");
    let result: Result<String, sqlx::Error> = sqlx::query_scalar("SELECT version()")
        .fetch_one(db.get_ref())
        .await;

    match result {
        Ok(version) => version,
        Err(e) => format!("Error: {:?}", e),
    }
}
}
If you are in watch mode or you try to compile, you will see that you don't get any kind of error. That's because the code in health.rs is not being used yet.
Let's use it now. Open the api > lib > src > lib.rs file, remove all the content, and add the following line at the top of the file:
#![allow(unused)]
fn main() {
pub mod health;
}
A couple of things to take into account here:
lib.rsfiles are the default entrypoint for library crates.- The line we introduced in the
lib.rsfile is doing two things.- First of all, it is declaring a new module called
health(hence the compiler will care about ourhealth.rsfile's content). - Secondly, it is making that module public. This means that we can access everything that we export from that module.
- First of all, it is declaring a new module called
Now, if you compile, you should be getting errors from the compiler complaining about dependencies. Let's add them to the Cargo.toml file:
[dependencies]
# actix
actix-web = "4.9.0"
# database
sqlx = { version = "0.7", default-features = false, features = [
    "tls-native-tls",
    "macros",
    "postgres",
    "uuid",
    "chrono",
    "json",
] }
# tracing
tracing = "0.1"
We will be adding more dependencies in the future, but for now, this is enough.
Finally, to make the compiler happy, let's import this in the top of the health.rs file:
#![allow(unused)]
fn main() {
use actix_web::get;
}
Everything should compile by now.
Note that we're not using any Shuttle dependency in this crate.
Using the endpoints
Now that we have our endpoints in a library, we can use them in our main.rs file. Let's do that.
Open the api > shuttle > src > main.rs file and remove the endpoints code that we copied before. Get rid of the unused use statements as well.
Do you know what to do next?
Solution
Solution
Yes, you only have to import the endpoints from the library. It's a one-liner:
#![allow(unused)]
fn main() {
use api_lib::health::{hello_world, version};
}
Is it working? It should!
If you want to try out the endpoints without using Shuttle, you can create a new binary crate in the api folder and use the endpoints there. Check the Actix Web documentation for more information.
This is out of the scope of this workshop because of time constraints but feel free to explore that option. You can also take a look at the workshop's GitHub repository to see how to do it.
Commit your changes:
git add .
git commit -m "move endpoints to a library"
Creating a health check endpoint
We're going to get rid of the previous endpoints and create a health check endpoint. This endpoint will be used to check if the application is running and ready to receive requests.
This endpoint will be very basic and will just return a 200 OK response with custom header containing the version (this is just for fun, not really needed at all).
Armed with the knowledge we've gained so far, we should be able to handle this change.
- The route should be
/healthand use theGETmethod. - The response should be a
200 OKwith a custom header namedversioncontaining the version (a&strcontaining "v0.0.1" for example). - As a hint, you can check the code in Actix Web docs to see how to return a simple
200 OKresponse. - You can also check out the HttpResponse docs to see how to add a header to the response.
Can you do it?
Solution
Solution
- Remove the previous endpoints.
- Create a new endpoint with the route
/healthand the methodGET.
#![allow(unused)]
fn main() {
use actix_web::{get, HttpResponse};

#[get("/health")]
async fn health() -> HttpResponse {
    HttpResponse::Ok()
        .append_header(("version", "0.0.1"))
        .finish()
}
}
- Configure the services in your shuttle crate. Remove the previous services and add the new one.
Your api > shuttle > src > main.rs file should look like this:
#![allow(unused)]
fn main() {
use actix_web::web::ServiceConfig;
use api_lib::health::health;
use shuttle_actix_web::ShuttleActixWeb;
use shuttle_runtime::CustomError;
use sqlx::Executor;

#[shuttle_runtime::main]
async fn actix_web(
    #[shuttle_shared_db::Postgres] pool: sqlx::PgPool,
) -> ShuttleActixWeb<impl FnOnce(&mut ServiceConfig) + Send + Clone + 'static> {
    // initialize the database if not already initialized
    pool.execute(include_str!("../../db/schema.sql"))
        .await
        .map_err(CustomError::new)?;

    let pool = actix_web::web::Data::new(pool);

    let config = move |cfg: &mut ServiceConfig| {
        cfg.app_data(pool).service(health);
    };

    Ok(config.into())
}
}
Test that everything is working by running the following command:
curl -i http://localhost:8000/health
You should get something like this:
HTTP/1.1 200 OK
content-length: 0
version: v0.0.1
date: Sun, 02 Jul 2023 10:35:15 GMT
Commit your changes.
git add .
git commit -m "add health check endpoint"
Using the configure method
You may have noticed that when our health.rs file contained two different endpoints, we had to add them as a service to the ServiceConfig in the actix_web function. This is not a problem when we have a few endpoints, but it can become a problem when we have many endpoints.
In order to make our code cleaner, we can use the configure function.
Take a look at the Actix Web docs to see how to use it.
Indeed, if you take a look at the code we have in our shuttle crate, you will see that we are already using it:
#![allow(unused)]
fn main() {
let config = move |cfg: &mut ServiceConfig| {
    cfg.app_data(pool).service(health);
};
}
You could change this code to this and it should work the same:
#![allow(unused)]
fn main() {
let config = move |cfg: &mut ServiceConfig| {
    cfg.app_data(pool).configure(|c| {
        c.service(health);
    });
};
}
Try it out!
Refactoring our code
Let's refactor our code to use the configure method both in the health.rs file and in the main.rs file.
In the main.rs file, we will be expecting to receive a configure function from the health module, so we will change the code to this:
#![allow(unused)]
fn main() {
let config = move |cfg: &mut ServiceConfig| {
    cfg.app_data(pool).configure(api_lib::health::service);
};
}
Note that it won't compile, because we haven't changed the health.rs file yet.
So, in the health.rs file, we need to export a function called service that receives a ServiceConfig and returns nothing.
#![allow(unused)]
fn main() {
// add the use statement for ServiceConfig
use actix_web::{get, web::ServiceConfig, HttpResponse};

pub fn service(cfg: &mut ServiceConfig) {
    cfg.service(health);
}
}
Now, we can run the code and it should work the same as before.
There are, though, a few things that we can change.
Not sure if you notice it but we required the pub keyword to be in front of the service function. This is because we are calling the function from another module. If we were calling it from the same module, we wouldn't need the pub keyword.
But then, how is that we didn't need that for the health function as well? Well, that's because we are using the #[get("/health")] macro, which automatically adds the pub keyword to the function.
Let's opt out of using macros and do it manually.
We will leverage the route method of the ServiceConfig struct. Check out the docs.
#![allow(unused)]
fn main() {
 use actix_web::{
    web::{self, ServiceConfig},
    HttpResponse,
};

pub fn service(cfg: &mut ServiceConfig) {
    cfg.route("/health", web::get().to(health));
}

async fn health() -> HttpResponse {
    HttpResponse::Ok()
        .append_header(("version", "v0.0.1"))
        .finish()
}
}
Everything should still work. Check it out and commit your changes.
git add .
git commit -m "use configure"
Unit and Integration tests
Although testing is a little bit out of the scope of this workshop, we thought it would be interesting to show you how to write tests for your API.
These will be simple examples of how to test the health endpoint.
For more information about testing in Actix Web, please refer to the Actix Web documentation.
For more information about testing in Rust, please refer to the Rust Book.
Unit tests
Unit tests are usually created in the same file containin the subject under test. In our case, we will create a unit test for the health endpoint in the api > lib > src > health.rs file.
The common practice is to create a new module called tests. But before that, we will need to add a dev-dependency to the Cargo.toml file of our library:
[dev-dependencies]
actix-rt = "2.0.0"
Now, let's add this to our health.rs file:
#![allow(unused)]
fn main() {
#[cfg(test)]
mod tests {
    use actix_web::http::StatusCode;

    use super::*;

    #[actix_rt::test]
    async fn health_check_works() {
        let res = health().await;

        assert!(res.status().is_success());
        assert_eq!(res.status(), StatusCode::OK);

        let data = res
            .headers()
            .get("health-check")
            .and_then(|h| h.to_str().ok());

        assert_eq!(data, Some("v0.0.1"));
    }
}
}
A few things to note here:
- The
#[cfg(test)]annotation tells the compiler to only compile the code in this module if we are running tests. - The
#[actix_rt::test]annotation tells the compiler to run this test in theActixruntime (giving you async support). - The
use super::*;statement imports all the items from the parent module even if they're not public (in this case, thehealthfunction).
Running the tests
To run the tests, you can use the following command:
cargo test
# or, if you prefer to test in watch mode:
cargo watch -x test
We introduced a bug in our test. Can you fix it?
Solution
Solution
The name of the header is version, not health-check. So, the either we change the name of the header in the test or we change the name of the header in the health function. Your call ;D.
Can you extract the version to a constant so we can reuse it in the test?
Solution
Solution
Declare the constant in the health.rs file and then use it in the health function and in the test:
#![allow(unused)]
fn main() {
const API_VERSION: &str = "v0.0.1";
}
Integration tests
Next, we're going to create an integration test for the health endpoint. This test will run the whole application and make a request to the health endpoint.
The convention is to have a tests folder in the root of the crate under test.
Let's create this folder and add a new file called health.rs in it. The path of the file should be api > lib > tests > health.rs.
Copy this content into it:
#![allow(unused)]
fn main() {
use actix_web::{http::StatusCode, App};
use api_lib::health::{service, API_VERSION};

#[actix_rt::test]
async fn health_check_works() {
    let app = App::new().configure(service);
    let mut app = actix_web::test::init_service(app).await;
    let req = actix_web::test::TestRequest::get()
        .uri("/health")
        .to_request();

    let res = actix_web::test::call_service(&mut app, req).await;

    assert!(res.status().is_success());
    assert_eq!(res.status(), StatusCode::OK);
    let data = res.headers().get("version").and_then(|h| h.to_str().ok());
    assert_eq!(data, Some(API_VERSION));
}
}
This code will fail, can you figure out why?
Solution
Solution
We need to make the API_VERSION constant public so we can use it in the test. To do that, we need to add the pub keyword to the constant declaration
For more information about Integration Tests check the links we provided above in the beginning of this section:
Don't forget to commit your changes:
git add .
git commit -m "add unit and integration tests"
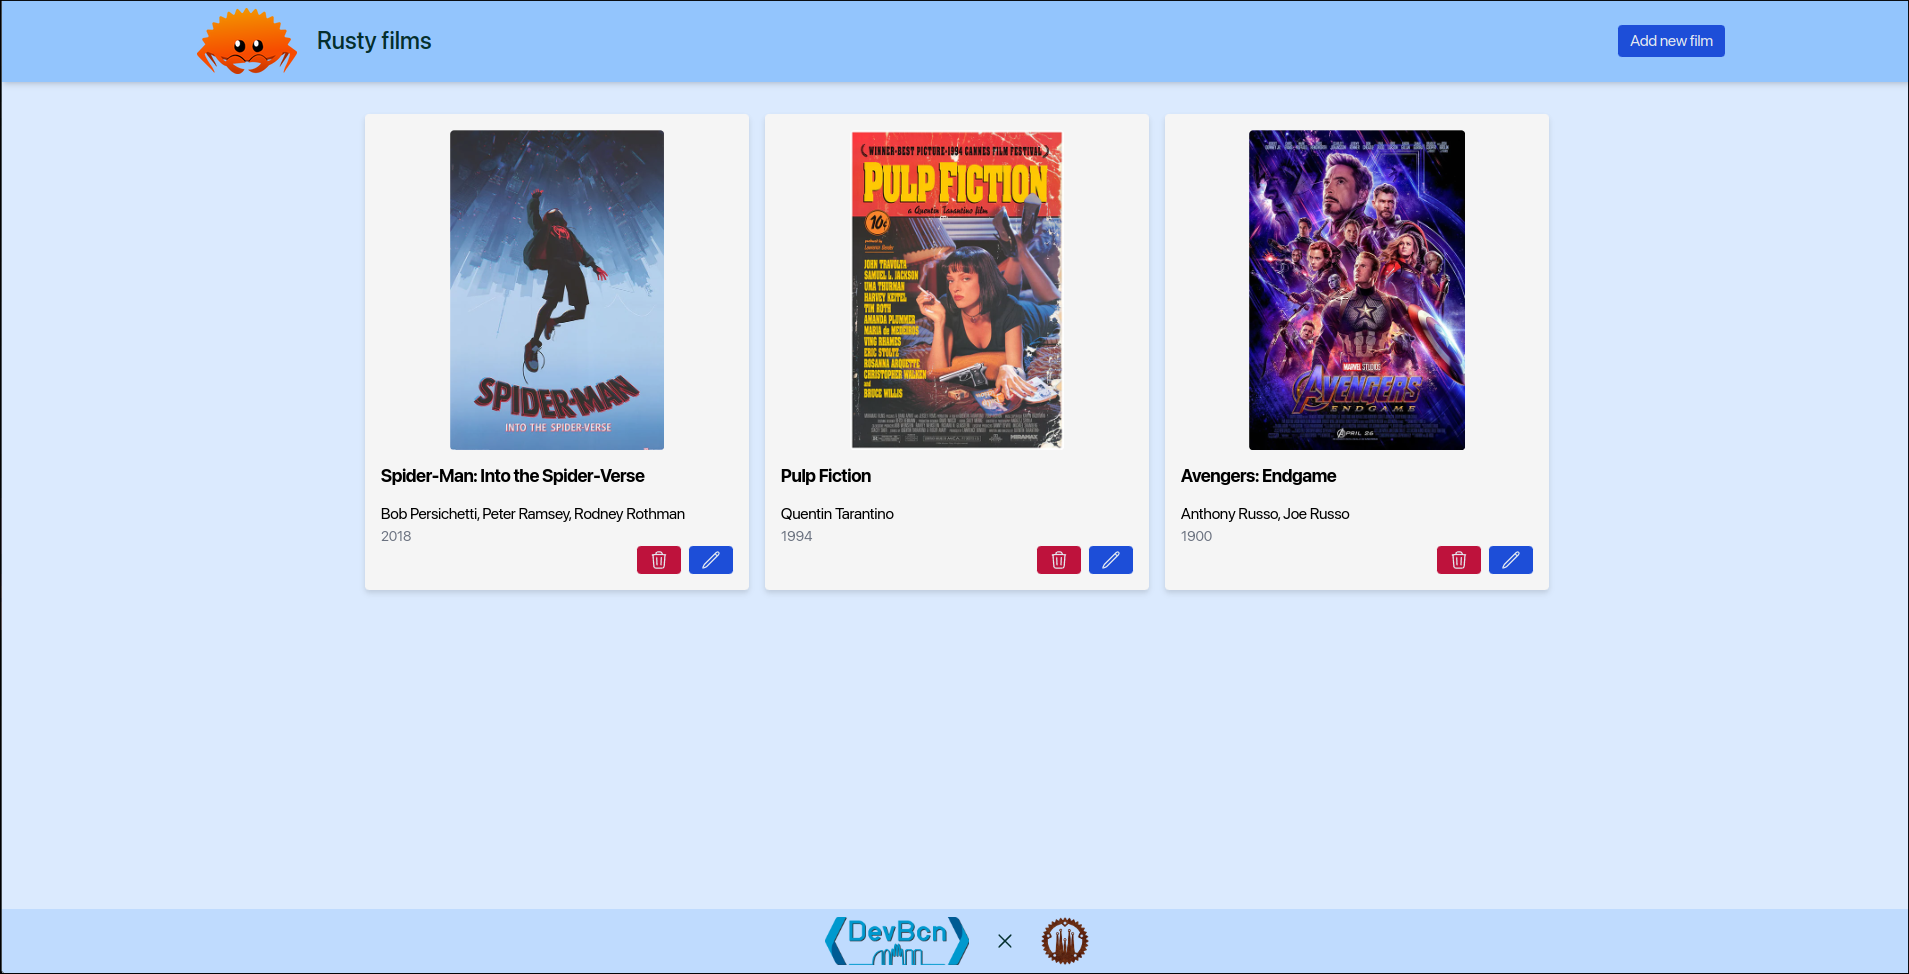
Films endpoints
We are going to build now the endpoints needed to manage films.
For now, don't worry about the implementation details, we will cover them in the next chapter. We will return a 200 OK response for all the endpoints.
We're going to provide the following endpoints:
GET /v1/films: returns a list of films.GET /v1/films/{id}: returns a film by id.POST /v1/films: creates a new film.PUT /v1/films: updates a film.DELETE /v1/films/{id}: deletes a film by id.
Creating the films module
Let's start by creating the films module in a similar way we did with the health module.
Create a new file called films.rs in the api > lib> src folder and declare the module in the lib.rs file:
#![allow(unused)]
fn main() {
pub mod films;
}
Now, let's create a new function called service in the films module which will be responsible of declaring all the routes for the films endpoints. Make it public. You can base all this code in the health module.
Can you guess how to create all the endpoints?
Take a look at the actix_web::Scope documentation to learn how to share a common path prefix for all the routes in the scope.
Solution
Solution
#![allow(unused)]
fn main() {
use actix_web::{
    web::{self, ServiceConfig},
    HttpResponse,
};

pub fn service(cfg: &mut ServiceConfig) {
    cfg.service(
        web::scope("/v1/films")
            // get all films
            .route("", web::get().to(get_all))
            // get by id
            .route("/{film_id}", web::get().to(get))
            // post new film
            .route("", web::post().to(post))
            // update film
            .route("", web::put().to(put))
            // delete film
            .route("/{film_id}", web::delete().to(delete)),
    );
}

async fn get_all() -> HttpResponse {
    HttpResponse::Ok().finish()
}

async fn get() -> HttpResponse {
    HttpResponse::Ok().finish()
}

async fn post() -> HttpResponse {
    HttpResponse::Ok().finish()
}

async fn put() -> HttpResponse {
    HttpResponse::Ok().finish()
}

async fn delete() -> HttpResponse {
    HttpResponse::Ok().finish()
}

}
Serving the films endpoints
In order to expose these newly created endpoints we need to configure the service in our shuttle crate.
Open the main.rs file in the api > shuttle > src folder and add a new service:
- cfg.app_data(pool).configure(api_lib::health::service);
+ cfg.app_data(pool)
+           .configure(api_lib::health::service)
+           .configure(api_lib::films::service);
Compile the code and check that everything works as expected.
You can use curl or Postman to test the new endpoints.
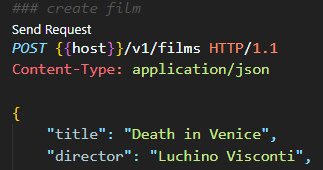
Alternatively, if you have installed the REST Client extension for Visual Studio Code, you can create a file called api.http in the root of the project and copy the following content:
@host = http://localhost:8000
@film_id = 6f05e5f2-133c-11ee-be9f-0ab7e0d8c876

### health
GET {{host}}/health HTTP/1.1

### create film
POST {{host}}/v1/films HTTP/1.1
Content-Type: application/json

{
    "title": "Death in Venice",
    "director": "Luchino Visconti",
    "year": 1971,
    "poster": "https://th.bing.com/th/id/R.0d441f68f2182fd7c129f4e79f6a66ef?rik=h0j7Ecvt7NBYrg&pid=ImgRaw&r=0"
}

### update film
PUT {{host}}/v1/films HTTP/1.1
Content-Type: application/json

{
    "id": "{{film_id}}",
    "title": "Death in Venice",
    "director": "Benjamin Britten",
    "year": 1981,
    "poster": "https://image.tmdb.org/t/p/original//tmT12hTzJorZxd9M8YJOQOJCqsP.jpg"
}

### get all films
GET {{host}}/v1/films HTTP/1.1

### get film
GET {{host}}/v1/films/{{film_id}} HTTP/1.1

### get bad film
GET {{host}}/v1/films/356e42a8-e659-406f-98 HTTP/1.1


### delete film
DELETE {{host}}/v1/films/{{film_id}} HTTP/1.1
Open it and just click on the Send Request link next to each request to send it to the server.
Commit your changes:
git add .
git commit -m "feat: add films endpoints"
Models
So now we have the films endpoints working, but they don't really do anything nor return any data.
In order to return data we need to create a model for our films.
As we want to share the model between the api and the frontend crates we will use the shared crate for this.
The shared crate is a library crate. This means that it can be used by other crates in the workspace.
Let's import the dependency in the Cargo.toml file of our api-lib crate:
[dependencies]
+ # shared
+ shared = { path = "../../shared" }
Verify that the project is still compiling.
Creating the Film model
We are going to create a new module called models in the shared crate.
Create a new file called models.rs in the shared > src folder and add the following code:
#![allow(unused)]
fn main() {
pub struct Film {
    pub id: uuid::Uuid, // we will be using uuids as ids
    pub title: String,
    pub director: String,
    pub year: u16, // only positive numbers
    pub poster: String, // we will use the url of the poster here
    pub created_at: Option<chrono::DateTime<chrono::Utc>>,
    pub updated_at: Option<chrono::DateTime<chrono::Utc>>,
}
}
We could make it more complicated but for the sake of simplicity we will just use a struct with a small amount of fields.
Now, remove everything from the lib.rs file in the shared crate and add the following code:
#![allow(unused)]
fn main() {
pub mod models;
}
Soon you will notice that the compiler will complain about the chrono and uuid dependencies.
Let's add them:
[dependencies]
+ uuid = { version = "1.3.4", features = ["serde", "v4", "js"] }
+ chrono = { version = "0.4", features = ["serde"] }
Most of the features you see are related to the fact that we want our API to be able to serialize and deserialize the models to and from JSON.
Compile the code and check that everything is fine.
Creating a model for the post endpoint
In our POST endpoint we will receive a JSON object with the following structure:
{
  "title": "The Lord of the Rings: The Fellowship of the Ring",
  "director": "Peter Jackson",
  "year": 2001,
  "poster": "https://www.imdb.com/title/tt0120737/mediaviewer/rm1340569600/",
}
We don't need to pass the id or the created_at and updated_at fields as they will be generated by the API, so let's create a new model for that.
#![allow(unused)]
fn main() {
pub struct CreateFilm {
    pub title: String,
    pub director: String,
    pub year: u16,
    pub poster: String,
}
}
Compile again just in case and commit your changes:
git add .
git commit -m "add models"
Serde
Serde is a framework for serializing and deserializing Rust data structures efficiently and generically.
We are going to use it to add serialization and deserialization support to our models.
Adding the dependency
Let's add the serde dependency to the Cargo.toml file of the shared crate:
[dependencies]
+ serde = { version = "1.0", features = ["derive"] }
Adding the derive feature will allow us to use the #[derive(Serialize, Deserialize)] macro on our models, which will automatically implement the Serialize and Deserialize traits for us.
As we will be working with JSON in our API, we need to bring in the serde_json crate as well in the Cargo.toml file of the api-lib crate:
[dependencies]
+ # serde
+ serde = "1.0"
+ serde_json = "1.0"
Adding the Serialize and Deserialize traits to our models
Let's add the Serialize and Deserialize traits to our Film and CreateFilm models.
For that, we are going to use the derive macro:
+ use serde::{Deserialize, Serialize};

+ #[derive(Serialize, Deserialize, Debug, Clone, PartialEq, Eq, PartialOrd, Ord, Default)]
pub struct Film {
    pub id: uuid::Uuid, // we will be using uuids as ids
    pub title: String,
    pub director: String,
    pub year: u16,      // only positive numbers
    pub poster: String, // we will use the url of the poster here
    pub created_at: Option<chrono::DateTime<chrono::Utc>>,
    pub updated_at: Option<chrono::DateTime<chrono::Utc>>,
}

+ #[derive(Serialize, Deserialize, Debug, Clone, PartialEq, Eq, PartialOrd, Ord, Default)]
pub struct CreateFilm {
    pub title: String,
    pub director: String,
    pub year: u16,
    pub poster: String,
}
Note that we added more traits. It's a common practice for libraries to implement some of those traits to avoid issues when using them. See the orphan rule for more information.
Commit your changes:
git add .
git commit -m "add serde dependency and derive traits"
Film Repository
Today, our API will work with a Postgres database. But this may change in the future.
Even if that never happens (which is the most probable thing) we will still want to decouple our API from the database to make it easier to test and maintain.
To do that, we will leverage traits to define the behavior of our film repository.
This will also allow us to take a look at:
Defining the FilmRepository trait
We will define this trait in the api-lib crate although it could be its own crate if we wanted.
To keep it simple create a new film_repository folder in api > lib > src and add a mod.rs file with the following content:
#![allow(unused)]
fn main() {
pub type FilmError = String;
pub type FilmResult<T> = Result<T, FilmError>;

pub trait FilmRepository: Send + Sync + 'static {
    async fn get_films(&self) -> FilmResult<Vec<Film>>;
    async fn get_film(&self, id: &Uuid) -> FilmResult<Film>;
    async fn create_film(&self, id: &CreateFilm) -> FilmResult<Film>;
    async fn update_film(&self, id: &Film) -> FilmResult<Film>;
    async fn delete_film(&self, id: &Uuid) -> FilmResult<Uuid>;
}
}
Don't forget to add the module to the lib.rs file:
#![allow(unused)]
fn main() {
pub mod film_repository;
}
The code won't compile. But don't worry, we will fix that in a minute.
Let's review for a moment that piece of code:
- We define two type aliases:
FilmErrorandFilmResult<T>. This will allow us to easily change theerrortype if we need to and to avoid boilerplate when having to write the return of our functions. - The Send & Sync traits will allow us to share and send this the types implementiong this trait between threads.
- The
'staticlifetime will make our life easier as we know that the repository will live for the entire duration of the program. - Finally, you see that we have defined 5 functions that will allow us to interact with our database. We will implement them in the next section.
Then, why does this code not compile?
The reason is that we are using the async keyword in our trait definition. This is not allowed by the Rust compiler.
To fix this, we will use the async-trait crate.
async-trait
Let's bring this dependency into our api-lib crate by adding it to the Cargo.toml file. As we will be using the uuid crate in our repository, we will also add it to the Cargo.toml file:
[dependencies]
+ # utils
+ async-trait = "0.1.82"
+ uuid = { version = "1.3.4", features = ["serde", "v4", "js"] }
Now, let's mark our trait as async and add all the use statements we need:
+ use shared::models::{CreateFilm, Film};
+ use uuid::Uuid;

pub type FilmError = String;
pub type FilmResult<T> = Result<T, FilmError>;

+ #[async_trait::async_trait]
pub trait FilmRepository: Send + Sync + 'static {
    async fn get_films(&self) -> FilmResult<Vec<Film>>;
    async fn get_film(&self, id: &Uuid) -> FilmResult<Film>;
    async fn create_film(&self, id: &CreateFilm) -> FilmResult<Film>;
    async fn update_film(&self, id: &Film) -> FilmResult<Film>;
    async fn delete_film(&self, id: &Uuid) -> FilmResult<Uuid>;
}
Now, the code compiles. But we still need to implement the trait. We will do it in the next section.
mod.rs
You probably noticed that we created file called mod.rs in the film_repository folder.
So far, whenever we wanted to create a new module, we just used a file with the same name as the module. For example, we created a film module by creating a film.rs file.
There are several ways to work with modules, you can learn more about it here.
This is the old way of doing things with modules but it's still valid and widely used in the Rust community.
Most of the time, you will do this if you plan to add more modules under the film_repository folder. For example, you could add a memory_film_repository module to implement a memory repository.
For now, let's commit our changes:
git add .
git commit -m "add film repository trait"
Implementing the FilmRepository trait
Cool, let's create a new file called postgres_film_repository.rs in the film_repository folder and add the new module to the mod.rs file in the same folder. This time don't use the pub keyword when declaring the module.
The idea is that we will re-export the implementation as if it was coming from the film_repository module. This way, we can hide the implementation details from the rest of the application.
#![allow(unused)]
fn main() {
mod postgres_film_repository;
}
Implementation
Let's open the recently created postgres_film_repository.rs file and add the following code:
#![allow(unused)]
fn main() {
pub struct PostgresFilmRepository {
    pool: sqlx::PgPool,
}
}
Note that this is a simple struct that holds a sqlx::PgPool instance. This is the connection pool we will use to connect to the database.
We don't need to expose it, hence the pub keyword is not used.
Now, let's add a new associated function to the struct that will make us easier to create new instances of this struct:
#![allow(unused)]
fn main() {
impl PostgresFilmRepository {
    pub fn new(pool: sqlx::PgPool) -> Self {
        Self { pool }
    }
}
}
This sort of constructor pattern is very common in Rust and the convention is to use new as the name of the associated function.
Next, let's implement the FilmRepository trait for this struct:
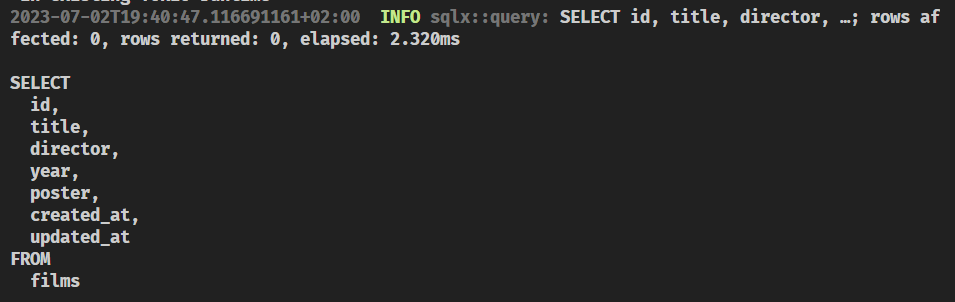
#![allow(unused)]
fn main() {
#[async_trait::async_trait]
impl FilmRepository for PostgresFilmRepository {
    async fn get_films(&self) -> FilmResult<Vec<Film>> {
        sqlx::query_as::<_, Film>(
            r#"
      SELECT id, title, director, year, poster, created_at, updated_at
      FROM films
      "#,
        )
        .fetch_all(&self.pool)
        .await
        .map_err(|e| e.to_string())
    }

    async fn get_film(&self, film_id: &uuid::Uuid) -> FilmResult<Film> {
        sqlx::query_as::<_, Film>(
            r#"
      SELECT id, title, director, year, poster, created_at, updated_at
      FROM films
      WHERE id = $1
      "#,
        )
        .bind(film_id)
        .fetch_one(&self.pool)
        .await
        .map_err(|e| e.to_string())
    }

    async fn create_film(&self, create_film: &CreateFilm) -> FilmResult<Film> {
        sqlx::query_as::<_, Film>(
            r#"
      INSERT INTO films (title, director, year, poster)
      VALUES ($1, $2, $3, $4)
      RETURNING id, title, director, year, poster, created_at, updated_at
      "#,
        )
        .bind(&create_film.title)
        .bind(&create_film.director)
        .bind(create_film.year as i16)
        .bind(&create_film.poster)
        .fetch_one(&self.pool)
        .await
        .map_err(|e| e.to_string())
    }

    async fn update_film(&self, film: &Film) -> FilmResult<Film> {
        sqlx::query_as::<_, Film>(
            r#"
      UPDATE films
      SET title = $2, director = $3, year = $4, poster = $5
      WHERE id = $1
      RETURNING id, title, director, year, poster, created_at, updated_at
      "#,
        )
        .bind(film.id)
        .bind(&film.title)
        .bind(&film.director)
        .bind(film.year as i16)
        .bind(&film.poster)
        .fetch_one(&self.pool)
        .await
        .map_err(|e| e.to_string())
    }

    async fn delete_film(&self, film_id: &uuid::Uuid) -> FilmResult<uuid::Uuid> {
        sqlx::query_scalar::<_, uuid::Uuid>(
            r#"
      DELETE FROM films
      WHERE id = $1
      RETURNING id
      "#,
        )
        .bind(film_id)
        .fetch_one(&self.pool)
        .await
        .map_err(|e| e.to_string())
    }
}
}
Don't forget to add the necessary imports:
#![allow(unused)]
fn main() {
use super::{FilmRepository, FilmResult};
use shared::models::{CreateFilm, Film};
}
Note that this code won't compile. Don't worry for the moment, we will fix it in a moment.
Take the time to review the code. Unfortunately, going deep into the details of SQLx is out of the scope of this tutorial. However, if you are interested in learning more about it, you can check the SQLx documentation.
Fixing the compilation error
If you check the compiler error you will see that it is complaining about the Film struct. It is telling us that it doesn't implement the FromRow trait.
This is because we are using the query_as method from SQLx, which requires that the struct implements the FromRow trait.
4  |   pub struct Film {
   |   --------------- doesn't satisfy `Film: FromRow<'r, PgRow>`
   |
   = note: the following trait bounds were not satisfied:
           `Film: FromRow<'r, PgRow>`
Let's fix this by implementing the FromRow trait for the Film struct.
We must do this in the shared crate, because the Film struct is defined there.
Add the SQLx dependency to the Cargo.toml file in the shared crate:
# database
sqlx = { version = "0.7", default-features = false, features = [
    "tls-native-tls",
    "macros",
    "postgres",
    "uuid",
    "chrono",
    "json",
] }
And then add the sqlx::FromRow trait into the derive attribute of the Film and CreateFilm structs.
Now we will hit another compiler error. FromRow doesn't work with u16.
Let's add a new annotation to the year field in both structs:
#![allow(unused)]
fn main() {
#[sqlx(try_from = "i16")]
}
This is how the models.rs file should look like
This is how the models.rs file should look like
#![allow(unused)]
fn main() {
use serde::{Deserialize, Serialize};

#[derive(
    Serialize, Deserialize, Debug, Clone, PartialEq, Eq, PartialOrd, Ord, Default, sqlx::FromRow,
)]
pub struct Film {
    pub id: uuid::Uuid, // we will be using uuids as ids
    pub title: String,
    pub director: String,
    #[sqlx(try_from = "i16")]
    pub year: u16, // only positive numbers
    pub poster: String, // we will use the url of the poster here
    pub created_at: Option<chrono::DateTime<chrono::Utc>>,
    pub updated_at: Option<chrono::DateTime<chrono::Utc>>,
}

#[derive(
    Serialize, Deserialize, Debug, Clone, PartialEq, Eq, PartialOrd, Ord, Default, sqlx::FromRow,
)]
pub struct CreateFilm {
    pub title: String,
    pub director: String,
    #[sqlx(try_from = "i16")]
    pub year: u16,
    pub poster: String,
}
}
Supporting WebAssmembly
We are almost done. The code is compiling but we still need to do some changes to make this shared crate work in the browser.
Our frontend will be compiled to WebAssembly, so we need to make sure that the shared crate can be compiled to WebAssembly.
The problem that we will face is that SQLx doesn't support WebAssembly yet.
So, how to solve this? Enter Cargo Features.
We will compile certain parts of the code only when a certain feature is enabled.
Note that this is how tests works. If you remember when we looked at that, each testing module is preceded by #[cfg(test)] annotation. This means that the code inside that module will only be compiled when the test feature is enabled.
Adding the backend feature
The idea is that we will only use the FromRow trait when the backend feature is enabled.
This should be true for all the backend code (the api-lib crate) but not for the frontend code.
Let's add the backend feature to the Cargo.toml file in the shared crate:
[features]
backend = ["sqlx"]
Then modify the sqlx dependency to make it optional:
sqlx = { version = "0.6.3", default-features = false, features = [ "runtime-actix-native-tls", "macros", "postgres", "uuid", "chrono", "json" ], optional = true }
That's it. As the SQLx dependency is now optional, it will only be used in case the backend feature is enabled.
Using the sqlx feature
Modify the models.rs file in the shared crate to look like this:
#![allow(unused)]
fn main() {
use serde::{Deserialize, Serialize};

#[cfg_attr(feature = "backend", derive(sqlx::FromRow))]
#[derive(Serialize, Deserialize, Debug, Clone, PartialEq, Eq, PartialOrd, Ord, Default)]
pub struct Film {
    pub id: uuid::Uuid,
    pub title: String,
    pub director: String,
    #[cfg_attr(feature = "backend", sqlx(try_from = "i16"))]
    pub year: u16,
    pub poster: String,
    pub created_at: Option<chrono::DateTime<chrono::Utc>>,
    pub updated_at: Option<chrono::DateTime<chrono::Utc>>,
}

#[cfg_attr(feature = "backend", derive(sqlx::FromRow))]
#[derive(Serialize, Deserialize, Debug, Clone, PartialEq, Eq, PartialOrd, Ord, Default)]
pub struct CreateFilm {
    pub title: String,
    pub director: String,
    #[cfg_attr(feature = "backend", sqlx(try_from = "i16"))]
    pub year: u16,
    pub poster: String,
}
}
But... the code doesn't compile!
Sure, no problem. We need to add the backend feature to the Cargo.toml file in the api-lib crate:
# shared
- shared = { path = "../../shared" }
+ shared = { path = "../../shared", features = ["backend"] }
We should be good by now but there's still a small detail to cover.
We want our PostgresFilmRepository struct to be available so we need expose it.
Head to the mod.rs file in api > lib > src > film_repository and add the following line:
#![allow(unused)]
fn main() {
pub use postgres_film_repository::PostgresFilmRepository;
}
Try to build a new module called memory_film_repository that implements the FilmRepository trait and uses an in-memory data structure to store the films.
You can also add tests to your implementation.
HINT: You can take a look at the workshop GitHub repository if you get stuck.
Plenty of work in this section. Check that everything compiles and commit your changes:
git add .
git commit -m "add postgres film repository"
Injecting the repository
Ok, so now we have our shared library working both for the frontend and the backend. We have our FilmRepository trait and even a Postgres implementation of it. Now we need to inject the repository into our handlers.
If you take a look again at the main.rs file of our api-shuttle crate, you will see that we were already sharing the sqlx::PgPool between the handlers.
We will do the same with the FilmRepository trait.
Creating a PostgresFilmRepository struct
Let's create a new instance of the PostgresFilmRepository struct in the main.rs file of our api-shuttle crate:
- let pool = actix_web::web::Data::new(pool);
+ let film_repository = api_lib::film_repository::PostgresFilmRepository::new(pool);
+ let film_repository = actix_web::web::Data::new(film_repository);

- cfg.app_data(pool)
+ cfg.app_data(film_repository)
Once you apply this change, everything should compile and work as before.
Commit your changes:
git add .
git commit -m "inject film repository"
Implementing the endpoints
In this section we are going to implement all the film endpoints.
One thing we know for sure is that all our handlers will need to access to a FilmRepository instance to do their work.
We already injected a particular implementation of the FilmRepository trait in our api-shuttle crate, but remember that here, we don't know which particular implementation we are going to use.
Indeed, we shouldn't care about the implementation details of the FilmRepository trait in our api-lib crate. We should only care about the fact that we have a FilmRepository trait that we can use to interact with the database.
So, it seems clear that we need to get access to the FilmRepository instance in our handlers. But how can we do that?
Refresh your memory by reading about how to handle State in Actix Web in the official documentation.
As you can see, it should be pretty straightforward isn't it? But, wait a minute. We have a problem here.
In all these examples, in order to extract a particular state we need to know its type. But we said we don't care about the particular type of the FilmRepository instance, we only care about the fact that we have a FilmRepository instance.
How can we reconcile these two things?
We have 2 options here.
We're going to cover them both briefly as this is out of the scope of the workshop.
Dynamic dispatch
The first option is to use dynamic dispatch.
This will generally make our code less performant (some times it doesn't really matter) but it will allow us to easily abstract away the particular trait implementations.
Learn more about this topic in the official Rust book.
The basic idea here is that we will use a Box<dyn FilmRepository> as our state type. This will allow us to store any type that implements the FilmRepository trait in our state.
- let film_repository = actix_web::web::Data::new(film_repository);
+ let film_repository: actix_web::web::Data<Box<dyn api_lib::film_repository::FilmRepository>> =
+       actix_web::web::Data::new(Box::new(film_repository));
Then, in our handlers, we will add this parameter:
#![allow(unused)]
fn main() {
repo: actix_web::web::Data<Box<dyn crate::film_repository::FilmRepository>>
}
For instance, in our get_all handler, we would use it like this:
#![allow(unused)]
fn main() {
 match repo.get_films().await {
    Ok(films) => HttpResponse::Ok().json(films),
    Err(e) => HttpResponse::NotFound().body(format!("Internal server error: {:?}", e)),
}
}
If you test that endpoint, you will see that it works as expected.
If you look into your terminal, you should be able to see the SQL query that was executed:
This is fairly easy, it works, and it's a common option.
Let's implement all the endpoints with this approach and then we'll see the second option.
Implementing the endpoints
Do you want to give it a try?
Solution
Solution
Make sure your code in the api-lib/src/film.rs file looks like this:
#![allow(unused)]
fn main() {
use actix_web::{
    web::{self, ServiceConfig},
    HttpResponse,
};
use shared::models::{CreateFilm, Film};
use uuid::Uuid;

use crate::film_repository::FilmRepository;

type Repository = web::Data<Box<dyn FilmRepository>>;

pub fn service(cfg: &mut ServiceConfig) {
    cfg.service(
        web::scope("/v1/films")
            // get all films
            .route("", web::get().to(get_all))
            // get by id
            .route("/{film_id}", web::get().to(get))
            // post new film
            .route("", web::post().to(post))
            // update film
            .route("", web::put().to(put))
            // delete film
            .route("/{film_id}", web::delete().to(delete)),
    );
}

async fn get_all(repo: Repository) -> HttpResponse {
    match repo.get_films().await {
        Ok(films) => HttpResponse::Ok().json(films),
        Err(e) => HttpResponse::NotFound().body(format!("Internal server error: {:?}", e)),
    }
}

async fn get(film_id: web::Path<Uuid>, repo: Repository) -> HttpResponse {
    match repo.get_film(&film_id).await {
        Ok(film) => HttpResponse::Ok().json(film),
        Err(_) => HttpResponse::NotFound().body("Not found"),
    }
}

async fn post(create_film: web::Json<CreateFilm>, repo: Repository) -> HttpResponse {
    match repo.create_film(&create_film).await {
        Ok(film) => HttpResponse::Ok().json(film),
        Err(e) => {
            HttpResponse::InternalServerError().body(format!("Internal server error: {:?}", e))
        }
    }
}

async fn put(film: web::Json<Film>, repo: Repository) -> HttpResponse {
    match repo.update_film(&film).await {
        Ok(film) => HttpResponse::Ok().json(film),
        Err(e) => HttpResponse::NotFound().body(format!("Internal server error: {:?}", e)),
    }
}

async fn delete(film_id: web::Path<Uuid>, repo: Repository) -> HttpResponse {
    match repo.delete_film(&film_id).await {
        Ok(film) => HttpResponse::Ok().json(film),
        Err(e) => {
            HttpResponse::InternalServerError().body(format!("Internal server error: {:?}", e))
        }
    }
}
}
Test the API by using the api.http file if you created it in one of the previous sections or by using any other tool.
Commit your changes:
git add .
git commit -m "implement film endpoints"
Static dispatch
You can check out this section of the Rust Book to understand about some of the trade-offs of using dynamic dispatch.
We're going to learn in this section how to use Generics to leverage static dispatch.
Refactor the film endpoints
Let's change all the code to use generics instead of trait objects:
#![allow(unused)]
fn main() {
use actix_web::{
    web::{self, ServiceConfig},
    HttpResponse,
};
use shared::models::{CreateFilm, Film};
use uuid::Uuid;

use crate::film_repository::FilmRepository;

pub fn service<R: FilmRepository>(cfg: &mut ServiceConfig) {
    cfg.service(
        web::scope("/v1/films")
            // get all films
            .route("", web::get().to(get_all::<R>))
            // get by id
            .route("/{film_id}", web::get().to(get::<R>))
            // post new film
            .route("", web::post().to(post::<R>))
            // update film
            .route("", web::put().to(put::<R>))
            // delete film
            .route("/{film_id}", web::delete().to(delete::<R>)),
    );
}

async fn get_all<R: FilmRepository>(repo: web::Data<R>) -> HttpResponse {
    match repo.get_films().await {
        Ok(films) => HttpResponse::Ok().json(films),
        Err(e) => HttpResponse::NotFound().body(format!("Internal server error: {:?}", e)),
    }
}

async fn get<R: FilmRepository>(film_id: web::Path<Uuid>, repo: web::Data<R>) -> HttpResponse {
    match repo.get_film(&film_id).await {
        Ok(film) => HttpResponse::Ok().json(film),
        Err(_) => HttpResponse::NotFound().body("Not found"),
    }
}

async fn post<R: FilmRepository>(
    create_film: web::Json<CreateFilm>,
    repo: web::Data<R>,
) -> HttpResponse {
    match repo.create_film(&create_film).await {
        Ok(film) => HttpResponse::Ok().json(film),
        Err(e) => {
            HttpResponse::InternalServerError().body(format!("Internal server error: {:?}", e))
        }
    }
}

async fn put<R: FilmRepository>(film: web::Json<Film>, repo: web::Data<R>) -> HttpResponse {
    match repo.update_film(&film).await {
        Ok(film) => HttpResponse::Ok().json(film),
        Err(e) => HttpResponse::NotFound().body(format!("Internal server error: {:?}", e)),
    }
}

async fn delete<R: FilmRepository>(film_id: web::Path<Uuid>, repo: web::Data<R>) -> HttpResponse {
    match repo.delete_film(&film_id).await {
        Ok(film) => HttpResponse::Ok().json(film),
        Err(e) => {
            HttpResponse::InternalServerError().body(format!("Internal server error: {:?}", e))
        }
    }
}
}
Hinting the compiler
If you try to compile the code, you'll get an error:
error[E0282]: type annotations needed
  --> api/shuttle/src/main.rs:22:24
   |
22 |             .configure(api_lib::films::service);
   |                        ^^^^^^^^^^^^^^^^^^^^^^^ cannot infer type of the type parameter `R` declared on the function `service`
   |
help: consider specifying the generic argument
   |
22 |             .configure(api_lib::films::service::<R>);
   |                                               +++++

For more information about this error, try `rustc --explain E0282`.
error: could not compile `api-shuttle` (bin "api-shuttle") due to previous error
Error: Build failed. Is the Shuttle runtime missing?
[Finished running. Exit status: 1]
But the compiler is giving us a hint on how to fix it. Let's do it.
Open the main.rs file of our api-shuttle crate and let's change a couple of things:
let film_repository = api_lib::film_repository::PostgresFilmRepository::new(pool);
- let film_repository: actix_web::web::Data<Box<dyn api_lib::film_repository::FilmRepository>> =
-       actix_web::web::Data::new(Box::new(film_repository));
+ let film_repository = actix_web::web::Data::new(film_repository);

let config = move |cfg: &mut ServiceConfig| {
    cfg.app_data(film_repository)
        .configure(api_lib::health::service)
-       .configure(api_lib::films::service);
+       .configure(api_lib::films::service::<api_lib::film_repository::PostgresFilmRepository>);
};
This should be enough to make the compiler happy. Now it knows what type to use for the R generic parameter.
Check that everything works as expected and commit your changes:
git add .
git commit -m "refactor film endpoints to use generics"
Serving static files
In this section of the backend part of the workshop we'll learn how to serve static files with Actix Web and Shuttle.
The main goal here is to serve the statics files present in a folder called static.
So the API will serve statics in the root path / and the API endpoints in the /api path.
For this to happen we will need to refactor a little bit our api-shuttle main code.
Shuttle dependencies
Read the Shuttle documentation for static files.
Some of the caveats that you will find explained there will apply to us as we are using a workspace, but let's start from the beginning.
Let's add the shuttle-static-folder and the actix-files dependencies to our api-shuttle crate.
[dependencies]
# static
actix-files = "0.6.6"
Serving the static files
Now, let's refactor our main.rs file to serve the static files.
Let's modify our ServiceConfig to serve static files in the / path and the API in the /api path:
- cfg.app_data(film_repository)
-   .configure(api_lib::health::service)
-   .configure(api_lib::films::service::<api_lib::film_repository::PostgresFilmRepository>);
+ cfg.service(
+     web::scope("/api")
+         .app_data(film_repository)
+         .configure(api_lib::health::service)
+         .configure(
+             api_lib::films::service::<api_lib::film_repository::PostgresFilmRepo+ sitory>,
+         ),
+ )
+ .service(Files::new("/", "static").index_file("index.html"));
Final Code
Final Code
#![allow(unused)]
fn main() {
use actix_web::web::{self, ServiceConfig};
use shuttle_actix_web::ShuttleActixWeb;
use shuttle_runtime::CustomError;
use sqlx::Executor;
use std::path::PathBuf;

#[shuttle_runtime::main]
async fn actix_web(
    #[shuttle_shared_db::Postgres] pool: sqlx::PgPool,
    #[shuttle_static_folder::StaticFolder(folder = "static")] static_folder: PathBuf,
) -> ShuttleActixWeb<impl FnOnce(&mut ServiceConfig) + Send + Clone + 'static> {
    // initialize the database if not already initialized
    pool.execute(include_str!("../../db/schema.sql"))
        .await
        .map_err(CustomError::new)?;

    let film_repository = api_lib::film_repository::PostgresFilmRepository::new(pool);
    let film_repository = web::Data::new(film_repository);

    let config = move |cfg: &mut ServiceConfig| {
        cfg.service(
            web::scope("/api")
                .app_data(film_repository)
                .configure(api_lib::health::service)
                .configure(
                    api_lib::films::service::<api_lib::film_repository::PostgresFilmRepository>,
                ),
        )
        .service(Files::new("/", "static").index_file("index.html"));
    };

    Ok(config.into())
}
}
You will get a runtime error:
[Running 'cargo shuttle run']
    Building /home/roberto/GIT/github/robertohuertasm/devbcn-dry-run
   Compiling api-shuttle v0.1.0 (/home/roberto/GIT/github/robertohuertasm/devbcn-dry-run/api/shuttle)
    Finished dev [unoptimized + debuginfo] target(s) in 9.00s
2023-07-02T18:49:07.514534Z ERROR cargo_shuttle: failed to load your service error="Custom error: failed to provision shuttle_static_folder :: StaticFolder"
[Finished running. Exit status: 1]
That's mainly because the static folder doesn't exist yet.
Create a folder called static in the api-shuttle crate and add a file called index.html with this content:
<!DOCTYPE html>
<html lang="en">
  <head>
    <meta charset="UTF-8" />
    <meta name="viewport" content="width=device-width, initial-scale=1.0" />
    <title>Hello Shuttle</title>
  </head>
  <body>
    Hello Shuttle
  </body>
</html>
Now if you browse to http://localhost:8000 you should be able to see the index.html file.
Remember that we have changed the path for the API to /api so you will need to change that too in your api.http file or Postman configuration.
Ignoring the static folder
As the static folder will be generated by the frontend, we don't want to commit it to our repository.
Add this to the .gitignore file:
# Ignore the static folder
static/
Now, to solve a Shuttle issue affecting static folders in workspaces, we need to create a .ignore file in the root folder with the following content:
!static/
Commit your changes:
git add .
git commit -m "serve static files"
Now, in order to deploy to the cloud and avoid having issues with the static folder not being found (remember there's currently an issue in the Shuttle static folder implementation), copy the static folder to the root of your project and deploy:
cargo shuttle deploy
Bonus: Makefile.toml
Final section of the backend part of the workshop.
Create a file in the root of the project called Makefile.toml with the following content:
# project tasks
[tasks.api-run]
workspace = false
env = { RUST_LOG="info" }
install_crate = "cargo-shuttle"
command = "cargo"
args = ["shuttle", "run"]

[tasks.front-serve]
workspace = false
cwd = "./front"
install_crate = "dioxus-cli"
command = "dioxus"
args = ["serve"]

[tasks.front-build]
workspace = false
script_runner = "@shell"
script = '''
# shuttle issue with static files
# location is different depending on the environment
rm -rf api/shuttle/static static
mkdir api/shuttle/static
mkdir static
cd front
dioxus build --release
# local development
cp -r dist/* ../api/shuttle/static
# production
cp -r dist/* ../static
'''

# local db
[tasks.db-start]
workspace = false
script_runner = "@shell"
script = '''
docker run -d --name devbcn-workshop -p 5432:5432 -e POSTGRES_PASSWORD=postgres -e POSTGRES_USER=postgres -e POSTGRES_DB=devbcn postgres
'''

[tasks.db-stop]
workspace = false
script_runner = "@shell"
script = '''
docker stop postgres
docker rm postgres
'''

# general tasks
[tasks.clippy]
workspace = false
install_crate = "cargo-clippy"
command = "cargo"
args = ["clippy"]

[tasks.format]
clear = true
workspace = false
install_crate = "rustfmt"
command = "cargo"
args = ["fmt", "--all", "--", "--check"]
It may be useful, specially for building the frontend.
Learn more about cargo-make, clippy and rustfmt.
Commit this change:
git add .
git commit -m "add Makefile.toml"
Frontend
In this guide, we'll be using Dioxus as the frontend for our project. Dioxus is a portable, performant, and ergonomic framework for building cross-platform user interfaces in Rust. Heavily inspired by React, Dioxus allows you to build apps for the Web, Desktop, Mobile, and more. Its core implementation can run anywhere with no platform-dependent linking, which means it's not intrinsically linked to WebSys like many other Rust frontend toolkits. However, it's important to note that Dioxus hasn't reached a stable release yet, so some APIs, particularly for Desktop, may still be unstable.
As for styling our app, we'll be using Tailwind CSS. Tailwind is a highly customizable, low-level CSS framework that gives you all of the building blocks you need to build bespoke designs without any annoying opinionated styles you have to fight to override. You can set it up in your project, build something with it in an online playground, and even learn more about it directly from the team on their channel. Tailwind also offers a set of beautiful UI components crafted by its creators to help you speed up your development process.
This combination of tools will allow us to concentrate our energy on frontend development in Rust, rather than spending excessive time on styling our app.
In our guide, we'll be providing hints on how to use Tailwind classes with our Dioxus components. This way, you can focus on the logic of your components, while still being able to apply responsive, modern styles to them.
Setup
This guide outlines the steps necessary to set up a frontend development environment using Dioxus and Tailwind.
Dioxus Configuration
Dioxus, a Rust framework, allows you to build responsive web applications. To use Dioxus, you need to install the Dioxus Command Line Interface (CLI) and the Rust target wasm32-unknown-unknown.
Step 1: Install the Dioxus CLI
Install the Dioxus CLI by running the following command:
cargo install dioxus-cli
Step 2: Install the Rust Target
Ensure the wasm32-unknown-unknown target for Rust is installed by running:
rustup target add wasm32-unknown-unknown
Step 3: Create a Frontend Crate
Create a new frontend crate from root of our project by executing:
cargo new --bin front
cd front
Update the project's workspace configuration by adding the following lines to the Cargo.toml file:
[workspace]
members = [
    "api/lib",
    "api/shuttle",
    "shared",
+   "front",
]
Step 4: Add Dioxus and the Web Renderer as Dependencies
Add Dioxus and the web renderer as dependencies to your project, modify your Cargo.toml file as follows:
#![allow(unused)]
fn main() {
...

[dependencies]
dioxus
dioxus = "0.4.3"
dioxus-web = "0.4.3"
}
Tailwind Configuration
Tailwind CSS is a utility-first CSS framework that can be used with Dioxus to build custom designs.
Step 1: Install Node Package Manager and Tailwind CSS CLI
Install Node Package Manager (npm) and the Tailwind CSS CLI.
Step 2: Initialize a Tailwind CSS Project
Initialize a new Tailwind CSS project using the following command:
cd front
npx tailwindcss init
This command creates a tailwind.config.js file in your project's root directory.
Step 3: Modify the Tailwind Configuration File
Edit the tailwind.config.js file to include Rust, HTML, and CSS files from the src directory and HTML files from the dist directory:
module.exports = {
    mode: "all",
    content: [
        // Include all Rust, HTML, and CSS files in the src directory
        "./src/**/*.{rs,html,css}",
        // Include all HTML files in the output (dist) directory
        "./dist/**/*.html",
    ],
    theme: {
        extend: {},
    },
    plugins: [
        require('tailwindcss-animated')
    ]
}
Step 4: Create an Input CSS File
Create an input.css file at the root of front crate and populate it with the following content:
@tailwind base;
@tailwind components;
@tailwind utilities;
Step 5: Tailwind animations
Install npm package tailwind-animated for small animations:
npm install tailwindcss-animated --save-dev
Linking Dioxus with Tailwind
To use Tailwind with Dioxus, create a Dioxus.toml file in your project's root directory. This file links to the tailwind.css file.
Step 1: Create a Dioxus.toml File
The Dioxus.toml file, placed inside our front crate root, should contain:
[application]

# App (Project) Name
name = "rusty-films"

# Dioxus App Default Platform
# desktop, web, mobile, ssr
default_platform = "web"

# `build` & `serve` dist path
out_dir = "dist"

# Resource (public) file folder
asset_dir = "public"

[web.app]

# HTML title tag content
title = "🦀 | Rusty Films"

[web.watcher]

# When watcher trigger, regenerate the `index.html`
reload_html = true

# Which files or dirs will be watcher monitoring
watch_path = ["src", "public"]

[web.resource]

# CSS style file
style = ["tailwind.css"]

# Javascript code file
script = []

[web.resource.dev]

# serve: [dev-server] only

# CSS style file
style = []

# Javascript code file
script = []
Update .gitignore
Ignore node_modules folder in .gitignore file:
target/
Secrets*.toml
static/
+dist/
+node_modules/
Additional Steps
Step 1: Install the Tailwind CSS IntelliSense VSCode Extension
The Tailwind CSS IntelliSense VSCode extension can help you write Tailwind classes and components more efficiently.
Step 2: Enable Regex Support for the Tailwind CSS IntelliSense VSCode Extension
Navigate to the settings for the Tailwind CSS IntelliSense VSCode extension and locate the experimental regex support section. Edit the setting.json file to look like this:
"tailwindCSS.experimental.classRegex": ["class: \"(.*)\""],
"tailwindCSS.includeLanguages": {
    "rust": "html"
},
This configuration enables the IntelliSense extension to recognize Tailwind classes in Rust files treated as HTML.
After completing these steps, your frontend development environment should be ready. You can now start building your web application using Dioxus and Tailwind CSS.
Starting the Application
Before we proceed, let's ensure that your project directory structure is set up correctly. Here's how the front folder should look:
front
├── Cargo.toml
├── src
│   └── main.rs
├── public
│   └── ... (place your static files here such as images)
├── input.css
├── tailwind.config.js
└── Dioxus.toml
Let's detail the contents:
-
Cargo.toml: The manifest file for Rust's package manager, Cargo. It holds metadata about your crate and its dependencies. -
src/main.rs: The primary entry point for your application. It contains the main function that boots your Dioxus app and the root component. -
public: This directory is designated for public assets for your application. Static files like images should be placed here. Also, the compiled CSS file (tailwind.css) from the Tailwind CSS compiler will be output to this directory. -
input.css: An input file for the Tailwind CSS compiler, which includes the basic Tailwind directives. -
tailwind.config.js: The configuration file for Tailwind CSS. It instructs the compiler where to find your source files and other configuration details. -
Dioxus.toml: This configuration file for Dioxus stipulates application metadata and build configurations.
Image resources
For this workshop, we have prepared a set of default images that you will be using in the development of the application. Feel free to use your own images if you wish.
The images should be placed as follows:
public
├── image1.png
├── image2.png
├── image3.png
└── ... (rest of your images)


Now that we've confirmed the directory structure, let's proceed to initialize your application...
To initialize your application, modify your main.rs file as follows:
#![allow(non_snake_case)]
// Import the Dioxus prelude to gain access to the `rsx!` macro and the `Scope` and `Element` types.
use dioxus::prelude::*;

fn main() {
    // Launch the web application using the App component as the root.
    dioxus_web::launch(App);
}

// Define a component that renders a div with the text "Hello, world!"
fn App(cx: Scope) -> Element {
    cx.render(rsx! {
        div {
            "Hello, DevBcn!"
        }
    })
}
With this setup, we've created a basic Dioxus web application that will display "Hello, world!" when run.
To launch our application in development mode, we'll need to perform two steps concurrently in separate terminal processes. Navigate to the front crate folder that was generated earlier, and proceed as follows:
- Start the Tailwind CSS compiler: Run the following command to initiate the Tailwind CSS compiler in watch mode. This will continuously monitor your
input.cssfile for changes, compile the CSS using your Tailwind configuration, and output the results topublic/tailwind.css.
npx tailwindcss -i ./input.css -o ./public/tailwind.css --watch
- Launch Dioxus in serve mode: Run the following command to start the Dioxus development server. This server will monitor your source code for changes, recompile your application as necessary, and serve the resulting web application.
dioxus serve --port 8000
Now, your development environment is up and running. Changes you make to your source code will automatically be reflected in the served application, thanks to the watching capabilities of both the Tailwind compiler and the Dioxus server. You're now ready to start building your Dioxus application!
Logging
For applications that run in the browser, having a logging mechanism can be very useful for debugging and understanding the application's behavior.
The first step towards this involves installing the wasm-logger crate. You can do this by running the following command:
...
[dependencies]
# dioxus
dioxus = "0.4.3"
dioxus-web = "0.4.3"
+log = "0.4.19"
+wasm-logger = "0.2.0"
Once wasm-logger is installed, you need to initialize it in your main.rs file. Here's how you can do it:
main.rs
...
fn main() {
+   wasm_logger::init(wasm_logger::Config::default().module_prefix("front"));
    // launch the web app
    dioxus_web::launch(App);
}
...
With the logger initialized, you can now log messages to your browser's console. The following is an example of how you can log an informational message:
By using this logging mechanism, you can make your debugging process more straightforward and efficient.
Components
Alright, let's roll up our sleeves and dive into building some reusable components for our app. We'll start with layout components and then craft some handy components that we can use all over our app.
When you're putting together a component, keep these points in mind:
- Always remember to import
dioxus::prelude::*. This gives you all the macros and functions you need, right at your fingertips. - Create a
pub fnwith your chosen component name. - Your function should include a
cx: Scopeparameter. - It should return an
Elementtype.
The real meat of our component is in the cx.render function. This is where the rsx! macro comes into play to create the markup of the component. You can put together your markup using html tags, attributes, and text.
Inside html tags, you can go wild with any attributes you want. Dioxus has a ton of them ready for you to use. But if you can't find what you're looking for, no problem! You can add it yourself using "double quotes".
#![allow(unused)]
fn main() {
use dioxus::prelude::*;

pub fn MyComponent(cx: Scope) -> Element {
    cx.render(rsx!(
        div {
            class: "my-component",
            "data-my-attribute": "my value",
            "My component"
        }
    ))
}
}
Layout Components
First up, we're going to craft some general layout components for our app. This is a nice, gentle introduction to creating components, and we'll also get some reusable pieces out of it. We're going to create:
HeadercomponentFootercomponent- We'll also tweak the
Appcomponent to incorporate these new components
Components Folder
Time to get our code all nice and organized! We're going to make a components folder in our src directory. This is where we'll store all of our components. This way, we can easily import them into our main.rs file. Neat, right?
If you want to get a deeper understanding of how to structure your code within a Rust project, the Rust Lang book has a fantastic section on it called Managing Growing Projects with Packages, Crates, and Modules. Definitely worth checking out!
Here's what our new structure will look like:
└── src                # Source code
    ├── components     # Components folder
    │   ├── mod.rs     # Components module
    │   ├── footer.rs  # Footer component
    │   └── header.rs  # Header component
And let's take a peek at what our mod.rs file should look like:
#![allow(unused)]
fn main() {
mod footer;
mod header;

pub use footer::Footer;
pub use header::Header;
}
We've got our mod.rs pulling double duty here. First, it's declaring our footer and header modules. Then, it's making Footer and Header available for other modules to use. This sets us up nicely for using these components in our main.rs file.
Header Component
Alright, let's start with the Header component. For now, we're keeping it simple, just displaying our app's title and a logo.
Whenever you're building a new component or working in our main.rs file, remember to import dioxus::prelude::*. It gives you access to all the macros and functions you need.
front/src/components/header.rs
#![allow(unused)]
fn main() {
use dioxus::prelude::*;

pub fn Header(cx: Scope) -> Element {
    cx.render(rsx!(
        header {
            class: "sticky top-0 z-10 text-gray-400 bg-blue-300 body-font shadow-md",
            div { class: "container mx-auto flex flex-wrap p-0 flex-col md:flex-row justify-between items-center",
                a {
                    class: "flex title-font font-medium items-center text-teal-950 mb-4 md:mb-0",
                    img {
                        class: "bg-transparent p-2 animate-jump",
                        alt: "ferris",
                        src: "ferris.png",
                        "loading": "lazy"
                    }
                    span { class: "ml-3 text-2xl", "Rusty films"}
                }
            }
        }
    ))
}
}
Footer Component
Next up, we're going to build the Footer component. This one's pretty straightforward – we're just going to stick a couple of images at the bottom of our app.
front/src/components/footer.rs
#![allow(unused)]
fn main() {
use dioxus::prelude::*;

pub fn Footer(cx: Scope) -> Element {
    cx.render(rsx!(
        footer {
            class: "bg-blue-200 w-full h-16 p-2 box-border gap-6 flex flex-row justify-center items-center text-teal-950",
            a {
                class: "w-auto h-full",
                href: "https://www.devbcn.com/",
                target: "_blank",
                img {
                    class: "h-full w-auto",
                    alt: "DevBcn",
                    src: "devbcn.png",
                    "loading": "lazy"
                }
            }
            svg {
                fill: "none",
                view_box: "0 0 24 24",
                stroke_width: "1.5",
                stroke: "currentColor",
                class: "w-6 h-6",
                path {
                    stroke_linecap: "round",
                    stroke_linejoin: "round",
                    d: "M6 18L18 6M6 6l12 12"
                }
            }
            a {
                class: "w-auto h-full",
                href: "https://www.meetup.com/es-ES/bcnrust/",
                target: "_blank",
                img {
                    class: "h-full w-auto",
                    alt: "BcnRust",
                    src: "bcnrust.png",
                    "loading": "lazy"
                }
            }
        }
    ))
}
}
Just like we did with the Header component, remember to import dioxus::prelude::* to have access to all the macros and functions we need. And feel free to change up the Tailwind classes to fit your design.
Now, we've got a Header and Footer ready to roll. Next, let's update our App component to use these new elements.
front/src/main.rs
#![allow(non_snake_case)]
// Import the Dioxus prelude to gain access to the `rsx!` macro and the `Scope` and `Element` types.
+mod components;

+use components::{Footer, Header};
use dioxus::prelude::*;


fn main() {
    // Launch the web application using the App component as the root.
    dioxus_web::launch(App);
}

// Define a component that renders a div with the text "Hello, world!"
fn App(cx: Scope) -> Element {
    cx.render(rsx! {
-       div {
-           "Hello, world!"
-       }
+       main {
+           class: "relative z-0 bg-blue-100 w-screen h-auto min-h-screen flex flex-col justify-start items-stretch",
+           Header {}
+           section {
+               class: "md:container md:mx-auto md:py-8 flex-1",
+           }
+           Footer {}
+       }
    })
}
Crafting Reusable Components
Let's turn up the heat in this section and start creating some more complex components for our app. Our assembly line will produce:
- A quick run-through on component props
- A Button that can be used anywhere in our app
- A Film Card to display details about a film
- A Film Modal for creating or updating films
Props
Before we start building, let's break down how we're going to define props in our components. We'll be doing this using two methods: struct and inline Props. The main difference between them lies in their location. struct Props are defined outside in a struct with prop macros and we attach the generic to our Scope type. On the other hand, inline Props are tucked right into the component function params. If you're craving more details about this, you can have a peek at the Dioxus Props documentation
Struct Props
These kinds of props are defined separately from the component function, and the generic type needs to be hooked onto the Scope type. We use the #[derive(Props)] macro to define the props:
#![allow(unused)]
fn main() {
#[derive(Props)]
pub struct FilmModalProps<'a> {
    on_create_or_update: EventHandler<'a, Film>,
    on_cancel: EventHandler<'a, MouseEvent>,
    #[props(!optional)]
    film: Option<Film>,
}

pub fn FilmModal<'a>(cx: Scope<'a, FilmModalProps>) -> Element<'a> {
    ...
}
}
Inline Props
Inline props are defined within the component function params. A nice plus is that you can access the prop variable directly inside the component, while struct props need a bit of navigation like cx.props.my_prop.
For these props, we tag the component function with the #[inline_props] macro.
#![allow(unused)]
fn main() {
#[inline_props]
pub fn FilmCard<'a>(
    cx: Scope<'a>,
    film: &'a Film,
    on_edit: EventHandler<'a, MouseEvent>,
    on_delete: EventHandler<'a, MouseEvent>,
) -> Element {
    ...
}
}
Alright, now that we've got props figured out, let's start building some components!
When you want to use props inside your components, here's how to do it: "{cx.props.my_prop}", "{my_prop}", or "{prop.to_string()}". Make sure to keep the curly braces and the prop name as shown.
Button
First up, we're creating a button. Since we'll be using this in various spots, it's a smart move to make it a reusable component.
front/src/components/button.rs
#![allow(unused)]
fn main() {
use dioxus::prelude::*;

use crate::models::ButtonType;

#[inline_props]
pub fn Button<'a>(
    cx: Scope<'a>,
    button_type: ButtonType,
    onclick: EventHandler<'a, MouseEvent>,
    children: Element<'a>,
) -> Element {
    cx.render(rsx!(button {
        class: "text-slate-200 inline-flex items-center border-0 py-1 px-3 focus:outline-none rounded mt-4 md:mt-0 {button_type.to_string()}",
        onclick: move |event| onclick.call(event),
        children
    }))
}
}
Notice that we're importing models::ButtonType here. This is an enum that helps us define the different button types we might use in our app. By using this, we can easily switch up the button styles based on our needs.
Button props are pretty straightforward.
button_typeprop that takes aButtonTypeenum and assign the right Tailwind classes to the button.onclickprop that takes anEventHandlerfor the click event, and achildrenprop that takes anElementfor the button text, icon or whateverElementdesired.
Just like we did with the components, we're going to set up a models folder inside our frontend directory. Here, we'll create a button.rs file to hold our Button models. While we're at it, let's also create a film.rs file for our Film models. We'll need those soon!
└── src                # Source code
    ├── models         # Models folder
    │   ├── mod.rs     # Models module
    │   ├── button.rs  # Button models
    │   └── film.rs    # Film models
Here's what we're working with for these files:
front/src/models/mod.rs
#![allow(unused)]
fn main() {
mod button;
mod film;

pub use button::ButtonType;
pub use film::FilmModalVisibility;
}
front/src/models/button.rs
#![allow(unused)]
fn main() {
use std::fmt;

pub enum ButtonType {
    Primary,
    Secondary,
}

impl fmt::Display for ButtonType {
    fn fmt(&self, f: &mut fmt::Formatter) -> fmt::Result {
        match self {
            ButtonType::Primary => write!(f, "bg-blue-700 hover:bg-blue-800 active:bg-blue-900"),
            ButtonType::Secondary => write!(f, "bg-rose-700 hover:bg-rose-800 active:bg-rose-900"),
        }
    }
}
}
front/src/models/film.rs
#![allow(unused)]
fn main() {
pub struct FilmModalVisibility(pub bool);
}
But wait, what's that impl thing in button.rs? This is where Rust's implementation blocks come in. We're using impl to add methods to our ButtonType enum. Specifically, we're implementing the Display trait, which gives us a standard way to display our enum as a string. The fmt method determines how each variant of the enum should be formatted as a string. So, when we use button_type.to_string() in our Button component, it will return the right Tailwind classes based on the button type. Handy, right?
Update components module
Add the button module to the components module.
front/src/components/mod.rs
+mod button;
mod footer;
mod header;

+pub use button::Button;
pub use footer::Footer;
pub use header::Header;
Film Card
Moving along, our next creation is the Film Card component. Its role is to present the specifics of a film in our list. Moreover, it will integrate a pair of Button components allowing us to edit and delete the film.
front/src/components/film_card.rs
#![allow(unused)]
fn main() {
use crate::{components::Button, models::ButtonType};
use dioxus::prelude::*;
use shared::models::Film;

#[inline_props]
pub fn FilmCard<'a>(
    cx: Scope<'a>,
    film: &'a Film,
    on_edit: EventHandler<'a, MouseEvent>,
    on_delete: EventHandler<'a, MouseEvent>,
) -> Element {
    cx.render(rsx!(
        li {
            class: "film-card md:basis-1/4 p-4 rounded box-border bg-neutral-100 drop-shadow-md transition-all ease-in-out hover:drop-shadow-xl flex-col flex justify-start items-stretch animate-fade animate-duration-500 animate-ease-in-out animate-normal animate-fill-both",
            header {
                img {
                    class: "max-h-80 w-auto mx-auto rounded",
                    src: "{film.poster}"
                },
            }
            section {
                class: "flex-1",
                h3 {
                    class: "text-lg font-bold my-3",
                    "{film.title}"
                }
                p {
                    "{film.director}"
                }
                p {
                    class: "text-sm text-gray-500",
                    "{film.year.to_string()}"
                }
            }
            footer {
                class: "flex justify-end space-x-2 mt-auto",
                Button {
                    button_type: ButtonType::Secondary,
                    onclick: move |event| on_delete.call(event),
                    svg {
                        fill: "none",
                        stroke: "currentColor",
                        stroke_width: "1.5",
                        view_box: "0 0 24 24",
                        class: "w-5 h-5",
                        path {
                            stroke_linecap: "round",
                            stroke_linejoin: "round",
                            d: "M14.74 9l-.346 9m-4.788 0L9.26 9m9.968-3.21c.342.052.682.107 1.022.166m-1.022-.165L18.16 19.673a2.25 2.25 0 01-2.244 2.077H8.084a2.25 2.25 0 01-2.244-2.077L4.772 5.79m14.456 0a48.108 48.108 0 00-3.478-.397m-12 .562c.34-.059.68-.114 1.022-.165m0 0a48.11 48.11 0 013.478-.397m7.5 0v-.916c0-1.18-.91-2.164-2.09-2.201a51.964 51.964 0 00-3.32 0c-1.18.037-2.09 1.022-2.09 2.201v.916m7.5 0a48.667 48.667 0 00-7.5 0"
                        }
                    }
                }
                Button {
                    button_type: ButtonType::Primary,
                    onclick: move |event| on_edit.call(event),
                    svg {
                        fill: "none",
                        stroke: "currentColor",
                        stroke_width: "1.5",
                        view_box: "0 0 24 24",
                        class: "w-5 h-5",
                        path {
                            stroke_linecap: "round",
                            stroke_linejoin: "round",
                            d: "M16.862 4.487l1.687-1.688a1.875 1.875 0 112.652 2.652L6.832 19.82a4.5 4.5 0 01-1.897 1.13l-2.685.8.8-2.685a4.5 4.5 0 011.13-1.897L16.863 4.487zm0 0L19.5 7.125"
                        }
                    }
                }
            }
        }
    ))
}
}
This Film Card component is indeed more intricate than the Button component, due to its wider use of Tailwind classes and the incorporation of event handlers. Let's dissect this a bit:
on_editandon_deleteare event handlers that we introduce into the component. They are responsible for managing the click events on the edit and delete buttons respectively.filmis a reference to the film whose details we are exhibiting in the card.
Film Modal
As the grand finale of our components building phase, we're constructing the Film Modal component. This vital piece will facilitate the creation or update of a film. Its appearance will be commanded by a button located in the app's header or the edit button inside the Film Card.
front/src/components/film_modal.rs
#![allow(unused)]
fn main() {
use dioxus::prelude::*;

use crate::components::Button;
use crate::models::{ButtonType};

#[derive(Props)]
pub struct FilmModalProps<'a> {
    on_create_or_update: EventHandler<'a, MouseEvent>,
    on_cancel: EventHandler<'a, MouseEvent>,
}

pub fn FilmModal<'a>(cx: Scope<'a, FilmModalProps>) -> Element<'a> {
    cx.render(rsx!(
        article {
            class: "z-50 w-full h-full fixed top-0 right-0 bg-gray-800 bg-opacity-50 flex flex-col justify-center items-center",
            section {
                class: "w-1/3 h-auto bg-white rounded-lg flex flex-col justify-center items-center box-border p-6",
                header {
                    class: "mb-4",
                    h2 {
                        class: "text-xl text-teal-950 font-semibold",
                        "🎬 Film"
                    }
                }
                form {
                    class: "w-full flex-1 flex flex-col justify-stretch items-start gap-y-2",
                    div {
                        class: "w-full",
                        label {
                            class: "text-sm font-semibold",
                            "Title"
                        }
                        input {
                            class: "w-full border border-gray-300 rounded-lg p-2",
                            "type": "text",
                            placeholder: "Enter film title",
                        }
                    }
                    div {
                        class: "w-full",
                        label {
                            class: "text-sm font-semibold",
                            "Director"
                        }
                        input {
                            class: "w-full border border-gray-300 rounded-lg p-2",
                            "type": "text",
                            placeholder: "Enter film director",
                        }
                    }
                    div {
                        class: "w-full",
                        label {
                            class: "text-sm font-semibold",
                            "Year"
                        }
                        input {
                            class: "w-full border border-gray-300 rounded-lg p-2",
                            "type": "number",
                            placeholder: "Enter film year",
                        }
                    }
                    div {
                        class: "w-full",
                        label {
                            class: "text-sm font-semibold",
                            "Poster"
                        }
                        input {
                            class: "w-full border border-gray-300 rounded-lg p-2",
                            "type": "text",
                            placeholder: "Enter film poster URL",
                        }
                    }
                }
                footer {
                    class: "flex flex-row justify-center items-center mt-4 gap-x-2",
                    Button {
                        button_type: ButtonType::Secondary,
                        onclick: move |evt| {
                            cx.props.on_cancel.call(evt)
                        },
                        "Cancel"
                    }
                    Button {
                        button_type: ButtonType::Primary,
                        onclick: move |evt| {
                            cx.props.on_create_or_update.call(evt);
                        },
                        "Save film"
                    }
                }
            }

        }
    ))
}
}
At the moment, we're primarily focusing on establishing the basic structural framework of the modal. We'll instill the logic in the upcoming section. The current modal props comprise on_create_or_update and on_cancel. These event handlers are key to managing the click events associated with modal actions.
on_create_or_update: This handler is in charge of creating or updating a film.on_cancel: This one takes responsibility for shutting down the modal and aborting any ongoing film modification or creation.
Let's update our main.rs file to include the Film Modal component. Film Card component will be added later.
front/src/main.rs
#![allow(non_snake_case)]
// import the prelude to get access to the `rsx!` macro and the `Scope` and `Element` types
+mod components;
+mod models;
...

-use components::{Footer, Header};
+use components::{FilmModal, Footer, Header};

...

fn App(cx: Scope) -> Element {
    ...
    cx.render(rsx! {
        main {
            ...
+           FilmModal {
+               on_create_or_update: move |_| {},
+               on_cancel: move |_| {}
+           }
        }
    })
}
State Management
In this part of our journey, we're going to dive into the lifeblood of the application — state management. We'll tackle this crucial aspect in two stages: local state management and global state management.
While we're only scratching the surface to get the application up and running, it's highly recommended that you refer to the Dioxus Interactivity documentation. This way, you'll not only comprehend how it operates more fully, but also grasp the extensive capabilities the framework possesses.
For now, let's start with the basics. Dioxus as is very influenced by React and its ecosystem, so it's no surprise that it uses the same approach to state management, Hooks.
Hooks are Rust functions that take a reference to ScopeState (in a component, you can pass cx), and provide you with functionality and state. Dioxus allows hooks to maintain state across renders through a reference to ScopeState, which is why you must pass &cx to them.
- Hooks may be only used in components or other hooks
- On every call to the component function
- The same hooks must be called
- In the same order
- Hooks name's should start with
use_so you don't accidentally confuse them with regular functions
Implementing Global State
To begin, let's create a global state responsible for managing the visibility of our Film Modal.
We will utilize a functionality similar to React's Context. This approach allows us to establish a context that will be accessible to all components contained within the context provider. To this end, we will construct a use_shared_state_provider that will be located within our App component.
The value should be initialized using a closure.
front/src/main.rs
...
use components::{FilmModal, Footer, Header};
use dioxus::prelude::*;
+use models::FilmModalVisibility;
...

fn App(cx: Scope) -> Element {
+    use_shared_state_provider(cx, || FilmModalVisibility(false));

...

}
Now, by leveraging the use_shared_state hook, we can both retrieve the state and modify it. Therefore, it is necessary to incorporate this hook in locations where we need to read or alter the Film Modal visibility.
front/src/components/header.rs
use dioxus::prelude::*;
+use crate::{
+   components::Button,
+   models::{ButtonType, FilmModalVisibility},
+};
...

pub fn Header(cx: Scope) -> Element {
+   let is_modal_visible = use_shared_state::<FilmModalVisibility>(cx).unwrap();

    cx.render(rsx!(
        header {
            class: "sticky top-0 z-10 text-gray-400 bg-blue-300 body-font shadow-md",
            div { class: "container mx-auto flex flex-wrap p-0 flex-col md:flex-row justify-between items-center",
                a {
                    class: "flex title-font font-medium items-center text-teal-950 mb-4 md:mb-0",
                    img {
                        class: "bg-transparent p-2 animate-jump",
                        alt: "ferris",
                        src: "ferris.png",
                        "loading": "lazy"
                    }
                    span { class: "ml-3 text-2xl", "Rusty films"}
                }
+               Button {
+                   button_type: ButtonType::Primary,
+                   onclick: move |_| {
+                       is_modal_visible.write().0 = true;
+                   },
+                   "Add new film"
+               }
            }
        }
    ))
}
The value can be updated using the write method, which returns a mutable reference to the value. Consequently, we can use the = operator to update the visibility of the Film Modal when the button is clicked.
front/src/components/film_modal.rs
...
-use crate::models::{ButtonType};
+use crate::models::{ButtonType, FilmModalVisibility};
...
pub fn FilmModal<'a>(cx: Scope<'a, FilmModalProps>) -> Element<'a> {
+   let is_modal_visible = use_shared_state::<FilmModalVisibility>(cx).unwrap();

...
+    if !is_modal_visible.read().0 {
+        return None;
+    }
...
}
This demonstrates an additional concept of Dioxus: dynamic rendering. Essentially, the component is only rendered if the condition is met.
Dynamic rendering is a technique that enables rendering different content based on a condition. Further information can be found in the Dioxus Dynamic Rendering documentation
front/src/main.rs
...

fn App(cx: Scope) -> Element {
    use_shared_state_provider(cx, || FilmModalVisibility(false));
+   let is_modal_visible = use_shared_state::<FilmModalVisibility>(cx).unwrap();


    ...
    cx.render(rsx! {
        main {
            ...
            FilmModal {
                on_create_or_update: move |_| {},
                on_cancel: move |_| {
+                  is_modal_visible.write().0 = false;
                }
            }
        }
    })
}
In the same manner we open the modal by altering the value, we can also close it. Here, we close the modal when the cancel button is clicked, invoking the write method to update the value.
Local state
In the context of component state, we typically refer to the local state. Dioxus simplifies the management of a component's state with the use_state hook. Noteworthy characteristics of this hook include:
- State initialization is achieved by passing a closure that returns the initial state.
#![allow(unused)]
fn main() {
let mut count = use_state(cx, || 0);
}
- The
use_statehook provides the current value viaget()and enables its modification usingset(). - Each value update triggers a component re-render.
In the main.rs file, the App component needs to be updated to introduce some local state. This state will be situated at the top of our app and can be passed to components as props. Our app's local states will consist of:
films: A list of films.selected_film: The film to be updated.force_get_films: A flag that will be employed to force a refetch of the films list from the API.
We are going to apply dynamic rendering again, this time to render a list of Film Cards only if the films list is not empty.
front/src/main.rs
...
-use components::{FilmModal, Footer, Header};
+use components::{FilmCard, FilmModal, Footer, Header};
use dioxus::prelude::*;
use models::FilmModalVisibility;
+use shared::models::Film;

...

fn App(cx: Scope) -> Element {
    use_shared_state_provider(cx, || FilmModalVisibility(false));
    let is_modal_visible = use_shared_state::<FilmModalVisibility>(cx).unwrap();
+   let films = use_state::<Option<Vec<Film>>>(cx, || None);
+   let selected_film = use_state::<Option<Film>>(cx, || None);
+   let force_get_films = use_state(cx, || ());

...

    cx.render(rsx! {
        main {
        ...
            section {
                class: "md:container md:mx-auto md:py-8 flex-1",
+               if let Some(films) = films.get() {
+                  rsx!(
+                      ul {
+                         class: "flex flex-row justify-center items-stretch gap-4 flex-wrap",
+                         {films.iter().map(|film| {
+                             rsx!(
+                                  FilmCard {
+                                      key: "{film.id}",
+                                      film: film,
+                                      on_edit: move |_| {
+                                          selected_film.set(Some(film.clone()));
+                                          is_modal_visible.write().0 = true
+                                      },
+                                      on_delete: move |_| {}
+                                  }
+                              )
+                          })}
+                      }
+                  )
+              }
            }
        ...
        }
        FilmModal {
+           film: selected_film.get().clone(),
            on_create_or_update: move |new_film| {},
            on_cancel: move |_| {
+               selected_film.set(None);
+               is_modal_visible.write().0 = false;
            }
        }
    })
}
As you can observe, the Film Modal is opened when the FilmCard edit button is clicked. Additionally, the selected film is passed as a prop to the FilmModal component.
We will implement the delete film feature later.
The FilmModal component also undergoes an update in the on_cancel callback to clear the selected film and close the modal, in case we decide not to create or update a film.
We utilize the clone method to generate a copy of the selected film. This is because we're employing the same film object in the FilmCard. Check Clone documentation from Rust by Example to learn more about the clone method.
Finally, it's essential to modify the FilmModal component to:
- Accept the selected film as a prop.
- Add a
draft_filmlocal state to contain the film that will be created or updated. - Refresh the
on_cancelcallback to clear thedraft_filmand close the modal. - Update the
on_create_or_update callback to create or update the draft_film and close the modal.
- Assign values and change handlers to the input fields.
front/src/components/film_modal.rs
use dioxus::prelude::*;
+use shared::models::Film;
+use uuid::Uuid;

use crate::components::Button;
use crate::models::{ButtonType, FilmModalVisibility};

#[derive(Props)]
pub struct FilmModalProps<'a> {
-   on_create_or_update: EventHandler<'a, MouseEvent>,
+   on_create_or_update: EventHandler<'a, Film>,
    on_cancel: EventHandler<'a, MouseEvent>,
+   #[props(!optional)]
+   film: Option<Film>,
}

pub fn FilmModal<'a>(cx: Scope<'a, FilmModalProps>) -> Element<'a> {
    let is_modal_visible = use_shared_state::<FilmModalVisibility>(cx).unwrap();
+   let draft_film = use_state::<Film>(cx, || Film {
+       title: "".to_string(),
+       poster: "".to_string(),
+       director: "".to_string(),
+       year: 1900,
+       id: Uuid::new_v4(),
+       created_at: None,
+       updated_at: None,
+   });

    if !is_modal_visible.read().0 {
        return None;
    }
    cx.render(rsx!(
        article {
            class: "z-50 w-full h-full fixed top-0 right-0 bg-gray-800 bg-opacity-50 flex flex-col justify-center items-center",
            section {
                class: "w-1/3 h-auto bg-white rounded-lg flex flex-col justify-center items-center box-border p-6",
                header {
                    class: "mb-4",
                    h2 {
                        class: "text-xl text-teal-950 font-semibold",
                        "🎬 Film"
                    }
                }
                form {
                    class: "w-full flex-1 flex flex-col justify-stretch items-start gap-y-2",
                    div {
                        class: "w-full",
                        label {
                            class: "text-sm font-semibold",
                            "Title"
                        }
                        input {
                            class: "w-full border border-gray-300 rounded-lg p-2",
                            "type": "text",
                            placeholder: "Enter film title",
+                           value: "{draft_film.get().title}",
+                           oninput: move |evt| {
+                               draft_film.set(Film {
+                                   title: evt.value.clone(),
+                                   ..draft_film.get().clone()
+                               })
+                           }
                        }
                    }
                    div {
                        class: "w-full",
                        label {
                            class: "text-sm font-semibold",
                            "Director"
                        }
                        input {
                            class: "w-full border border-gray-300 rounded-lg p-2",
                            "type": "text",
                            placeholder: "Enter film director",
+                           value: "{draft_film.get().director}",
+                           oninput: move |evt| {
+                               draft_film.set(Film {
+                                   director: evt.value.clone(),
+                                   ..draft_film.get().clone()
+                               })
+                           }
                        }
                    }
                    div {
                        class: "w-full",
                        label {
                            class: "text-sm font-semibold",
                            "Year"
                        }
                        input {
                            class: "w-full border border-gray-300 rounded-lg p-2",
                            "type": "number",
                            placeholder: "Enter film year",
+                           value: "{draft_film.get().year.to_string()}",
+                           oninput: move |evt| {
+                               draft_film.set(Film {
+                                   year: evt.value.clone().parse::<u16>().unwrap_or(1900),
+                                   ..draft_film.get

().clone()
+                               })
+                           }
                        }
                    }
                    div {
                        class: "w-full",
                        label {
                            class: "text-sm font-semibold",
                            "Poster"
                        }
                        input {
                            class: "w-full border border-gray-300 rounded-lg p-2",
                            "type": "text",
                            placeholder: "Enter film poster URL",
+                           value: "{draft_film.get().poster}",
+                           oninput: move |evt| {
+                               draft_film.set(Film {
+                                   poster: evt.value.clone(),
+                                   ..draft_film.get().clone()
+                               })
+                           }
                        }
                    }
                }
                footer {
                    class: "flex flex-row justify-center items-center mt-4 gap-x-2",
                    Button {
                        button_type: ButtonType::Secondary,
                        onclick: move |evt| {
+                           draft_film.set(Film {
+                               title: "".to_string(),
+                               poster: "".to_string(),
+                               director: "".to_string(),
+                               year: 1900,
+                               id: Uuid::new_v4(),
+                               created_at: None,
+                               updated_at: None,
+                           });
                            cx.props.on_cancel.call(evt)
                        },
                        "Cancel"
                    }
                    Button {
                        button_type: ButtonType::Primary,
                        onclick: move |evt| {
-                           cx.props.on_create_or_update.call(evt);
+                           cx.props.on_create_or_update.call(draft_film.get().clone());
+                           draft_film.set(Film {
+                               title: "".to_string(),
+                               poster: "".to_string(),
+                               director: "".to_string(),
+                               year: 1900,
+                               id: Uuid::new_v4(),
+                               created_at: None,
+                               updated_at: None,
+                           });
                        },
                        "Save film"
                    }
                }
            }

        }
    ))
}
Finally add uuid dependency to the Cargo.toml file.
front/Cargo.toml
...
[dependencies]
# shared
shared = { path = "../shared" }
# dioxus
dioxus = "0.4.3"
dioxus-web = "0.4.3"
wasm-logger = "0.2.0"
+uuid = { version = "1.3.4", features = ["serde", "v4", "js"] }
App Effects
Alright folks, we've got our state management all set up. Now, the magic happens! We need to synchronize the values of that state when different parts of our app interact with our users.
Imagine our first call to the API to fetch our freshly minted films, or the moment when we open the Film Modal in edit mode. We need to pre-populate the form with the values of the film we're about to edit.
No sweat, we've got the use_effect hook to handle this. This useful hook allows us to execute a function when a value changes, or when the component is mounted or unmounted. Pretty cool, huh?
Now, let's break down the key parts of the use_effect hook:
- It should be nestled inside a closure function.
- If we're planning to use a
use_statehook inside it, we need toclone()it or pass the ownership usingto_owned()to the closure function. - The parameters inside the
use_effect()function include the Scope of our app (cx), thedependenciesthat will trigger the effect again, and afuturethat will spring into action when the effect is triggered.
Here's a quick look at how it works:
#![allow(unused)]
fn main() {
{
  let some_state = some_state.clone();
  use_effect(cx, change_dependency, |_| async move {
    // Do something with some_state or something else
  })
}
}
Film Modal
We will begin by adapting our FilmModal component. This will be modified to pre-populate the form with the values of the film that is currently being edited. To accomplish this, we will use the use_effect hook.
front/src/components/film_modal.rs
...

pub fn FilmModal<'a>(cx: Scope<'a, FilmModalProps>) -> Element<'a> {
    let is_modal_visible = use_shared_state::<FilmModalVisibility>(cx).unwrap();
    let draft_film = use_state::<Film>(cx, || Film {
        title: "".to_string(),
        poster: "".to_string(),
        director: "".to_string(),
        year: 1900,
        id: Uuid::new_v4(),
        created_at: None,
        updated_at: None,
    });

+   {
+       let draft_film = draft_film.clone();
+       use_effect(cx, &cx.props.film, |film| async move {
+           match film {
+               Some(film) => draft_film.set(film),
+               None => draft_film.set(Film {
+                   title: "".to_string(),
+                   poster: "".to_string(),
+                   director: "".to_string(),
+                   year: 1900,
+                   id: Uuid::new_v4(),
+                   created_at: None,
+                   updated_at: None,
+               }),
+           }
+       });
+   }

    ...
}
In essence, we are initiating an effect when the film property changes. If the film property is Some(film), we set the draft_film state to the value of the film property. If the film property is None, we set the draft_film state to a new Film initial object.
App Component
Next, we will adapt our App component to fetch the films from the API when the app is mounted or when we need to force the API to update the list of films. We'll accomplish this by modifying force_get_films. As this state has no type or initial value, it is solely used to trigger the effect.
We will also add HTTP request configurations to enable these functions. We will use the reqwest crate for this purpose, which can be added to our Cargo.toml file or installed with the following command:
cargo add reqwest
To streamline future requests, we will create a films_endpoint() function to return the URL of our API endpoint.
First install some missing dependencies by updating our Cargo.toml.
front/Cargo.toml
+reqwest = { version = "0.11.18", features = ["json"] }
+web-sys = "0.3.64"
+serde = { version = "1.0.164", features = ["derive"] }
After that, here are the necessary modifications for the App component:
front/src/main.rs
...

+const API_ENDPOINT: &str = "api/v1";

+fn films_endpoint() -> String {
+   let window = web_sys::window().expect("no global `window` exists");
+   let location = window.location();
+   let host = location.host().expect("should have a host");
+   let protocol = location.protocol().expect("should have a protocol");
+   let endpoint = format!("{}//{}/{}", protocol, host, API_ENDPOINT);
+   format!("{}/films", endpoint)
+}

+async fn get_films() -> Vec<Film> {
+   log::info!("Fetching films from {}", films_endpoint());
+   reqwest::get(&films_endpoint())
+       .await
+       .unwrap()
+       .json::<Vec<Film>>()
+       .await
+       .unwrap()
+}

fn App(cx: Scope) -> Element {
    ...
    let force_get_films = use_state(cx, || ());

+   {
+       let films = films.clone();


+       use_effect(cx, force_get_films, |_| async move {
+           let existing_films = get_films().await;
+           if existing_films.is_empty() {
+               films.set(None);
+           } else {
+               films.set(Some(existing_films));
+           }
+       });
+   }
}
What we have done here is trigger an effect whenever there is a need to fetch films from our API. We then evaluate whether there are any films available. If there are, we set the films state to these existing films. If not, we set the films state to None. This allows us to enhance our App component with additional functionality.
Event Handlers
Event handlers are crucial elements in an interactive application. These functions are invoked in response to certain user events like mouse clicks, keyboard input, or form submissions.
In the final section of this guide, we will introduce interactivity to our application by implementing creation, updating, and deletion of film actions. For this, we will be spawning futures using cx.spawn and async move closures. It is crucial to remember that use_state values should be cloned before being used in async move closures.
delete_film Function
This function will be triggered when a user clicks the delete button of a film card. It will send a DELETE request to our API and subsequently call force_get_films to refresh the list of films. In the event of a successful operation, a message will be logged to the console. If an error occurs, the error will be logged instead.
#![allow(unused)]
fn main() {
let delete_film = move |filmId| {
    let force_get_films = force_get_films.clone();
    cx.spawn({
        async move {
            let response = reqwest::Client::new()
                .delete(&format!("{}/{}", &films_endpoint(), filmId))
                .send()
                .await;
            match response {
                Ok(_data) => {
                    log::info!("Film deleted");
                    force_get_films.set(());
                }
                Err(err) => {
                    log::info!("Error deleting film: {:?}", err);
                }
            }
        }
    });
};
}
create_or_update_film Function
This function is invoked when the user clicks the create or update button of the film modal. It sends a POST or PUT request to our API, followed by a call to force_get_films to update the list of films. The decision to edit or create a film depends on whether the selected_film state is Some(film) or None.
In case of success, a console message is logged, the selected_film state is reset, and the modal is hidden. If an error occurs, the error is logged.
#![allow(unused)]
fn main() {
let create_or_update_film = move |film: Film| {
    let force_get_films = force_get_films.clone();
    let current_selected_film = selected_film.clone();
    let is_modal_visible = is_modal_visible.clone();

    cx.spawn({
        async move {
            let response = if current_selected_film.get().is_some() {
                reqwest::Client::new()
                    .put(&films_endpoint())
                    .json(&film)
                    .send()
                    .await
            } else {
                reqwest::Client::new()
                    .post(&films_endpoint())
                    .json(&film)
                    .send()
                    .await
            };
            match response {
                Ok(_data) => {
                    log::info!("Film created");
                    current_selected_film.set(None);
                    is_modal_visible.write().0 = false;
                    force_get_films.set(());
                }
                Err(err) => {
                    log::info!("Error creating film: {:?}", err);
                }
            }
        }
    });
};
}
Final Adjustments
All the subsequent modifications will be implemented on our App component.
front/src/main.rs
...

fn App(cx: Scope) -> Element {
    ...
    {
        let films = films.clone();
        use_effect(cx, force_get_films, |_| async move {
            let existing_films = get_films().await;
            if existing_films.is_empty() {
                films.set(None);
            } else {
                films.set(Some(existing_films));


            }
        });
    }

+   let delete_film = move |filmId| {
+       let force_get_films = force_get_films.clone();
+       cx.spawn({
+           async move {
+               let response = reqwest::Client::new()
+                   .delete(&format!("{}/{}", &films_endpoint(), filmId))
+                   .send()
+                   .await;
+               match response {
+                   Ok(_data) => {
+                       log::info!("Film deleted");
+                       force_get_films.set(());
+                   }
+                   Err(err) => {
+                       log::info!("Error deleting film: {:?}", err);
+                   }
+               }
+           }
+       });
+   };

+   let create_or_update_film = move |film: Film| {
+       let force_get_films = force_get_films.clone();
+       let current_selected_film = selected_film.clone();
+       let is_modal_visible = is_modal_visible.clone();
+       cx.spawn({
+           async move {
+               let response = if current_selected_film.get().is_some() {
+                   reqwest::Client::new()
+                       .put(&films_endpoint())
+                       .json(&film)
+                       .send()
+                       .await
+               } else {
+                   reqwest::Client::new()
+                       .post(&films_endpoint())
+                       .json(&film)
+                       .send()
+                       .await
+               };
+               match response {
+                   Ok(_data) => {
+                       log::info!("Film created");
+                       current_selected_film.set(None);
+                       is_modal_visible.write().0 = false;
+                       force_get_films.set(());
+                   }
+                   Err(err) => {
+                       log::info!("Error creating film: {:?}", err);
+                   }
+               }
+           }
+       });
+   };

    cx.render(rsx! {
        ...
        section {
                class: "md:container md:mx-auto md:py-8 flex-1",
                   rsx!(
                if let Some(films) = films.get() {
                       ul {
                          class: "flex flex-row justify-center items-stretch gap-4 flex-wrap",
                          {films.iter().map(|film| {
                              rsx!(
                                   FilmCard {
                                       key: "{film.id}",
                                       film: film,
                                       on_edit: move |_| {
                                           selected_film.set(Some(film.clone()));
                                           is_modal_visible.write().0 = true
                                       },
-                                      on_delete: move |_| {}
+                                      on_delete: move |_| {
+                                           delete_film(film.id);
+                                      }
                                   }
                               )
                           })}
                       }
                   )
               }
            }
        FilmModal {
            film: selected_film.get().clone(),
-           on_create_or_update: move |new_film| {},
+           on_create_or_update: move |new_film| {
+               create_or_update_film(new_film);
+           },
            on_cancel: move |_| {
                selected_film.set(None);
                is_modal_visible.write().0 = false;
            }
        }
    })
}
Upon successful implementation of the above changes, the application should now have the capability to create, update, and delete films.
Building for production
Inside our workspace root we some handy cargo-make tasks for the frontend also. Let's use one of them for building our frontend for production.
makers front-build
This will build our frontend for production and place the output in the shuttle/static directory. Now we can serve our frontend with the backend. Let's deploy it with Shuttle and see our results.
cargo shuttle deploy
Once the app is deploy it will look like this if everything went well.