Workspace Setup
Let's start by creating a new workspace for our project.
You can learn more about workspaces in the Rust Book
The basic idea is that we will create a monorepo with different crates that will be compiled together.
Remember that our project will have this structure:
├── api            # Rust API code
│   ├── lib        # Actix-Web API code
│   └── shuttle    # Shuttle project
├── front          # Dioxus front-end code
├── shared         # Common code shared between the API and the front-end
└── README.md      # Workshop instructions and guidance
Creating the workspace
Create a new folder for the project and initialize a new workspace by creating a Cargo.toml file with the following content:
[workspace]
members = [
    "api/lib",
    "api/shuttle",
    "shared"
]
resolver = "2"
We will add the front crate later, don't worry.
Initializing the repository
Let's initialize a new git repository for our project.
git init
Creating the crates
Now that we have a workspace, we can create the crates that will be part of it.
For the API, we will create two crates:
lib: Library containing the code for the API.shuttle: Executable for the shuttle project.
Having two different crates is totally optional, but it will allow us to have a cleaner project structure and will make it easy to reuse the API library code if we decide to not use Shuttle in the future.
Shuttle will allow us to run our API locally and deploy it to the cloud with minimal effort but it is not required to build the API.
We could decide to use a different executable to run our API that would use the lib crate as a dependency. For instance, we could use Actix Web directly to create such a binary and release it as a Docker image.
Creating the lib crate
Let's create the lib crate by running the following command:
cargo new api/lib --name api-lib --lib --vcs none
Note that we are using the --lib flag to create a library crate. If you forget to add this flag, you will have to manually change the Cargo.toml file to make it a library crate.
The vsc flag is used in this case to tell cargo to not initialize a new git repository. Remember that we already did that in the previous step.

Creating the shuttle crate
Let's create the shuttle crate by running the following command:
cargo shuttle init api/shuttle -t actix-web --name api-shuttle
Creating the shared crate
Finally, let's create the shared crate by running the following command:
cargo new shared --lib
Note we're not using the --name flag this time. This is because the name of the crate will be inferred from the name of the folder.
Buidling the project
Let's build the project to make sure everything is working as expected.
cargo build
You should see something like this:

As you can see, a new target folder has been created. This folder contains the compiled code for all the crates in the workspace and that's why we're seeing so many objects to be committed.
The target folder should be ignored by git.
Let's create a .gitignore file in the root of our repo and add the following content:
target/
Secrets*.toml
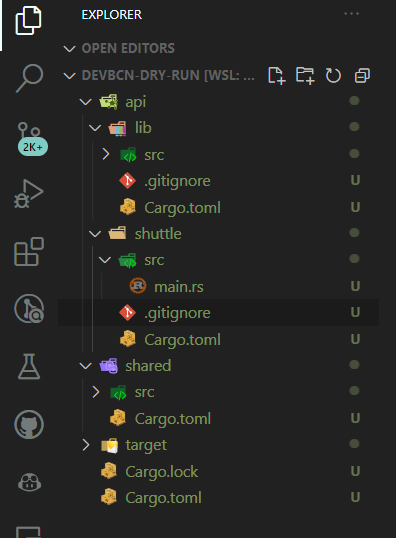
Aside from that, remove all the .gitignore files from the crates as they are not needed anymore.
This is how it should look like:

Committing the changes
If you have arrived here, you can commit your changes.
git add .
git commit -m "Initial commit"